This useful Zap is perfect for automatically archiving your meeting notes, ensuring your team has a complete record of conversations within Capsule CRM.
When a meeting recording is finished in Otter.ai, this Zap will find the corresponding contact in Capsule and add a meeting summary, next actions, and a link to the recording, as a note on their record. If the contact from the meeting doesn’t exist in Capsule, they will also be added as a new contact record.
Getting Started: What You'll Need
To build this automation, you will require:
- An Otter.ai account on the Pro, Business, or Enterprise plan (the free ‘Basic’ plan isn’t currently supported).
- Your Zapier plan needs to allow for multi-step Zaps.
- You’ll need to have your Otter.ai API key in order to complete the integration - this can be found here in your account, under ‘Zapier’.
How to set up the Otter.ai to Capsule Zap
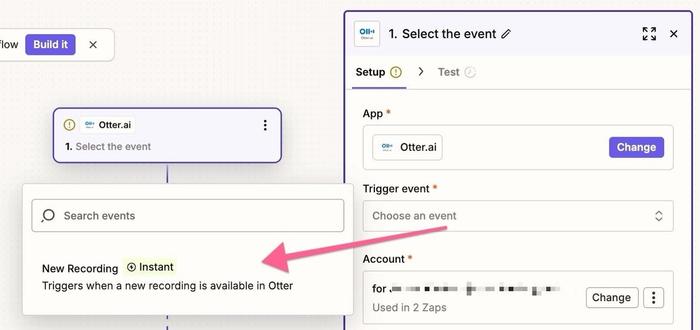
1. Set up the Otter.ai Trigger
Log in to your Zapier account and click the Create Zap button. In the Trigger step, search for and select Otter.ai as the app. For the 'Trigger event', choose New Recording and click Continue.
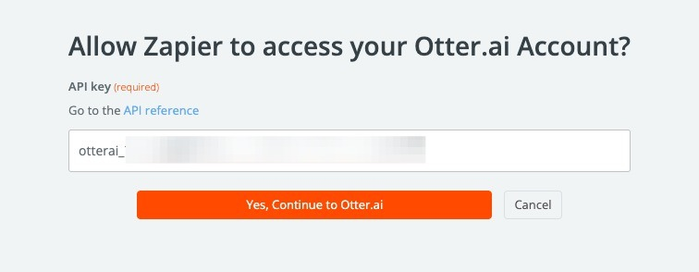
2. Connect Your Otter.ai Account
Click Sign in to connect your Otter.ai account. A new window will open allowing you to enter your Otter.ai API key, and authorize Zapier to access your recordings. You can quickly access your Otter API key in your account here. Further information about the Otter API can be found here.
Once connected, click Yes, Continue to Otter.ai.
3. Test the Otter.ai Trigger
To test Zapier’s connection to Otter.ai, click on Test trigger to verify that Zapier is able to see recent recordings. Zapier will load a sample recording to use for setting up the rest of your Zap. Select a sample and click Continue with selected record.

4. Find Meeting Attendee Email Addresses
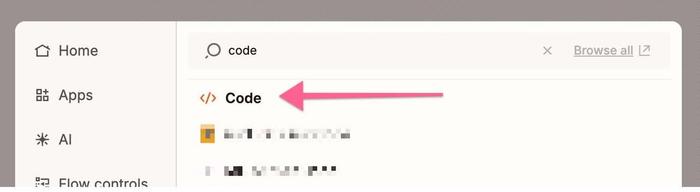
Next, we’re going to add a code step to extract the email address from Otter. Click the + sign under the New Recording step, and type ‘code’ into the search bar.
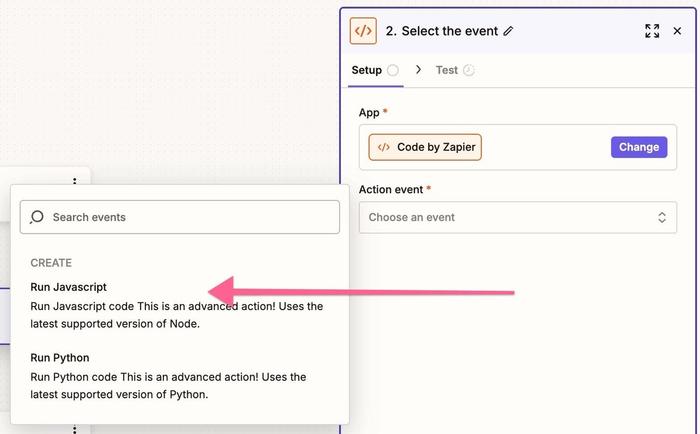
Next, select Run Javascript for the Action event and click Continue.
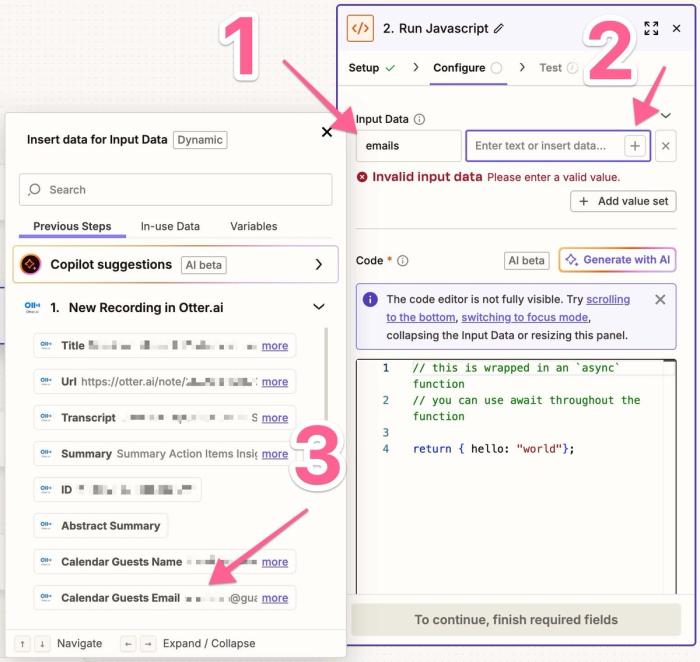
On the Configure page, type emails into the Input Data field illustrated below (1), click on the + symbol (2), and then select Calender Guests Email (3).
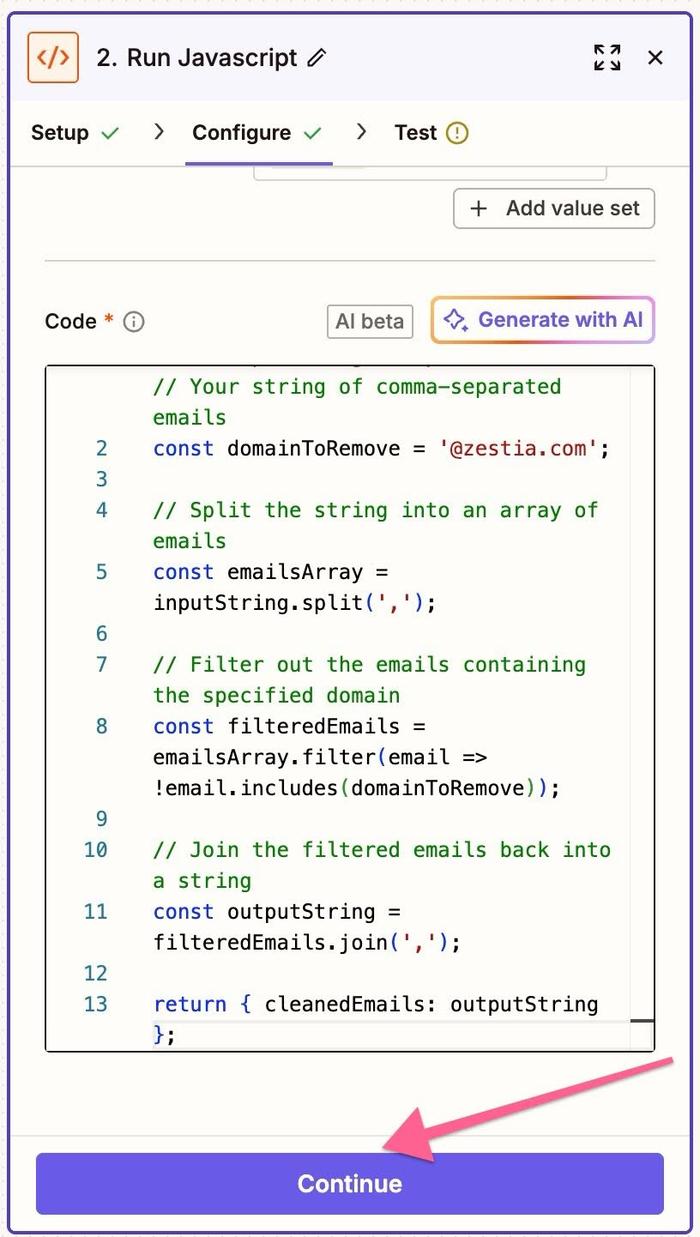
In the Code section of this page, delete the text in this box and paste the below code in.
const inputString = inputData.emails; // Your string of comma-separated emails
const domainToRemove = '@yourdomain.com';
// Split the string into an array of emails
const emailsArray = inputString.split(',');
// Filter out the emails containing the specified domain
const filteredEmails = emailsArray.filter(email => !email.includes(domainToRemove));
// Join the filtered emails back into a string
const outputString = filteredEmails.join(',');
return { cleanedEmails: outputString };
Then click Continue.
On the test step, choose Test step to ensure that it has removed your email address and retained your other call attendee’s email address.
5. Using Zapier’s Formatter to select the email address
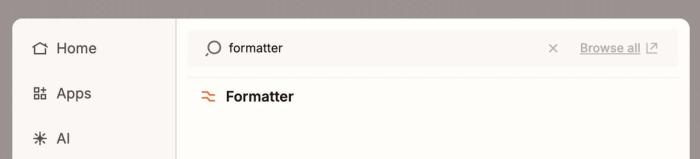
Next, we’re going to add a step to choose the email address to store the Capsule note on. Click the + sign under the Run JavaScript step, type ‘formatter’ into the search bar, and select Formatter.
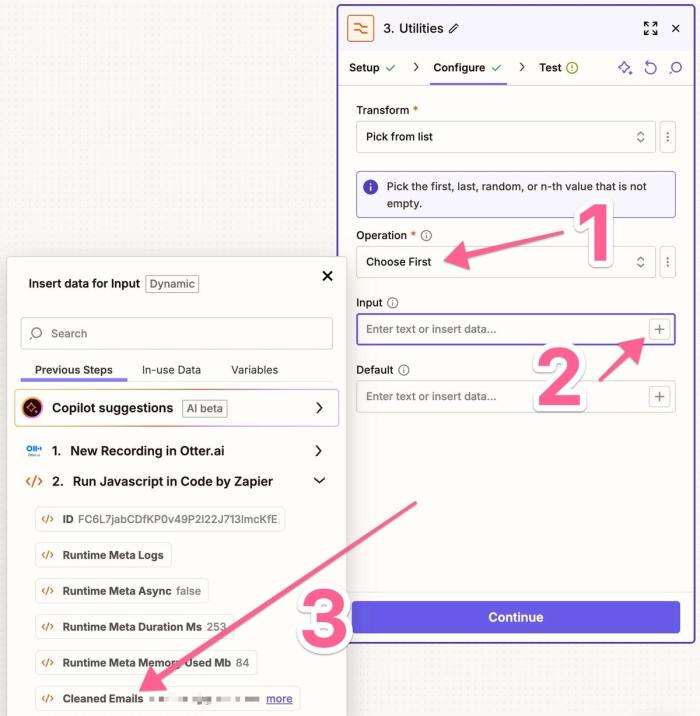
Select Utilities for the Action event and click continue. On the Configure page, select Pick from list on the Transform menu. Under Operation (1) select Choose First, and for the Input (2) choose Cleaned Emails (3). Ignore the Default field at the bottom, this can be left black. Click Continue.
On the Test page, select Test Step and ensure that an email is being successfully generated in the Output box. Click Continue.
6. Using Zapier’s Formatter to find the Contact’s name
Next, we’re going to add a step to find the contact name from the cleaned email address. Click the + sign under the Formatter step you’ve just created, type ‘formatter’ into the search bar, and select Formatter.
Choose Text for the Action event and click Continue. On the Configure page, enter the settings illustrated below, make sure to type [:space:] into the Separator field.
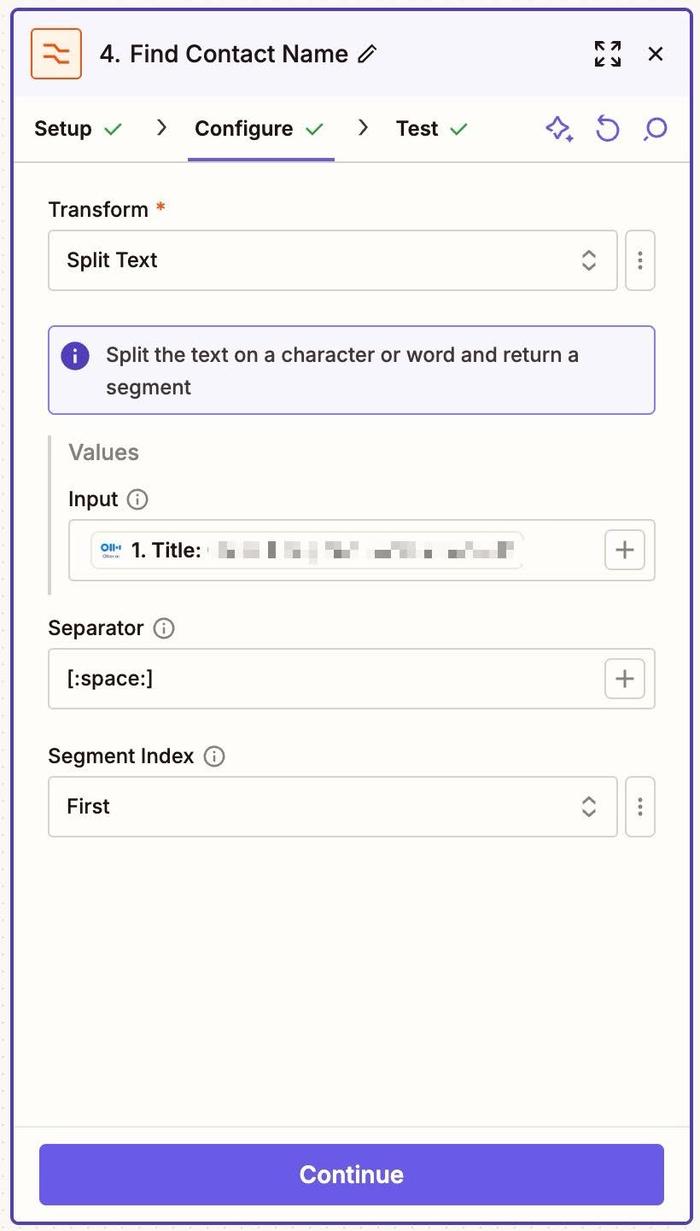
Click Continue to proceed to the Test page, and select Test Step. Ensure that the formatter is correctly outputting the contact’s name, and then click Continue.
7. Find or Create the Contact in Capsule CRM
Click the + icon to add a step, then choose Capsule CRM. For the Action event, select Find Contact. Sign in to your Capsule account and then click Continue. This step finds the contact in Capsule, so the transcript can be added to their record.
As illustrated below, in the Configure page, select Email Address in the Search using field, ‘is’ for the Operator, and for Value select the outputted email from Step 5 above.
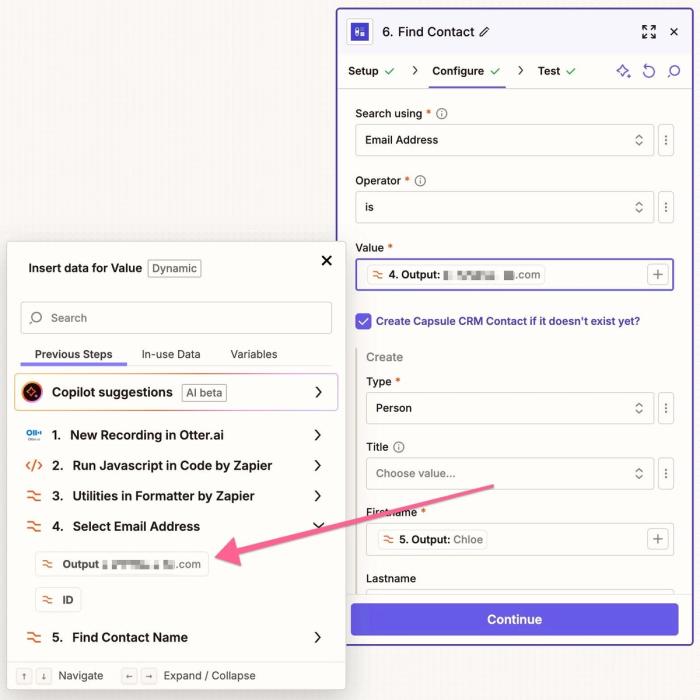
Check the box for Create Capsule CRM Contact if it doesn't exist yet?. Now, select Person for the Type, and map the contact's details from the Otter.ai data into the new contact fields. At a minimum, First Name and Email Address must be mapped here, for the contact to be successfully created in Capsule.
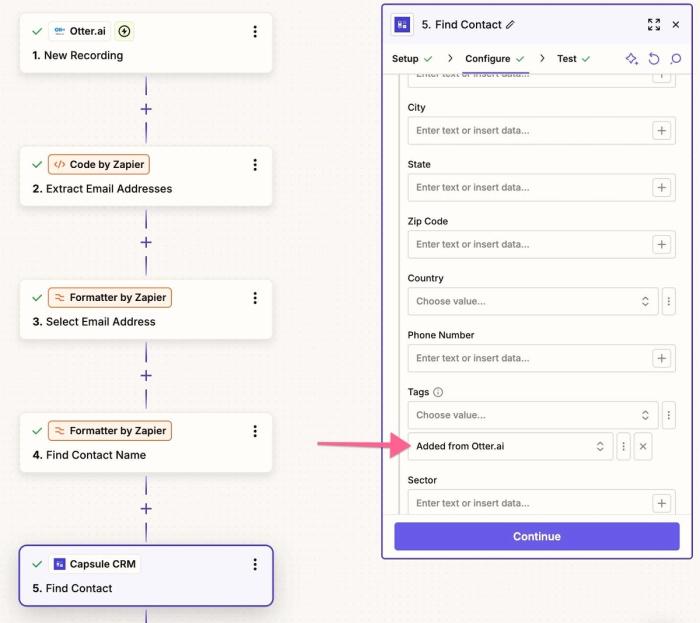
8. Optional Step - Add a Tag to New Contacts
To easily identify contacts added from Otter.ai, you can add a tag. Scroll down to the Tags field and select Choose value. This will display a list of your existing Capsule tags, so if you want to create a new one for this purpose, such as a tag named Added from Otter.ai, you’ll need to create this new tag in Capsule first.
The new tag will then be available in Zapier for use. Tagging the Capsule contacts created by this Zap is useful for filtering and segmenting these contacts in Capsule CRM.
9. Test the Find Contact Step
Click Continue on the Configure page, and test the action to ensure Zapier can successfully find or create a Contact in Capsule CRM with the data from Otter.ai. Once you click Test Step, review your Capsule account to ensure the test Contact has been successfully added, or found.
10. Add the "Add Note to Entity" Step
Click the + icon to add a final step. Choose Capsule CRM again. For the 'Action event', select Add Note to Entity and click Continue to proceed to the Configure page.
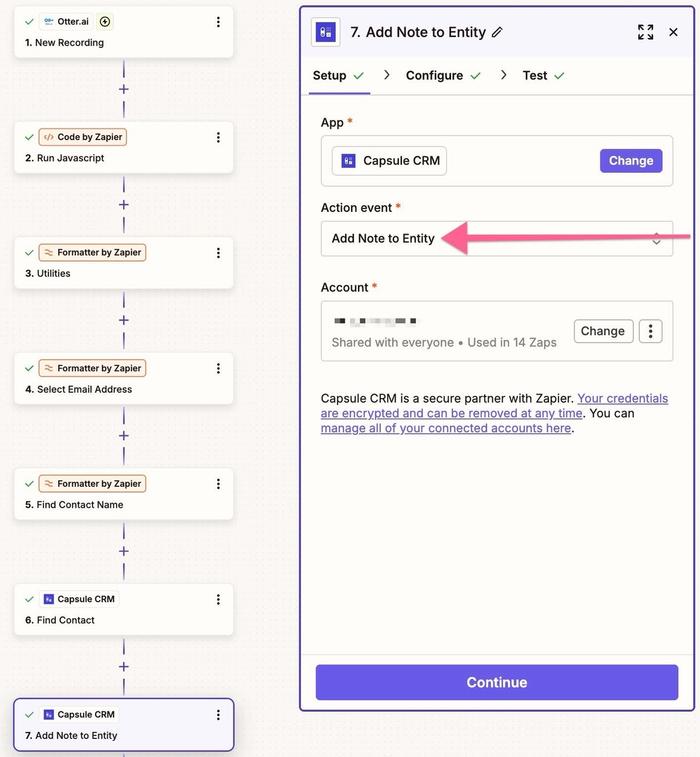
In the Entity Type field, select Contact. In Activity Type, choose the Activity type you would like these call transcripts to be logged as in Capsule. In the Contact field, select the + and select the ID from the previous Find Contact step:
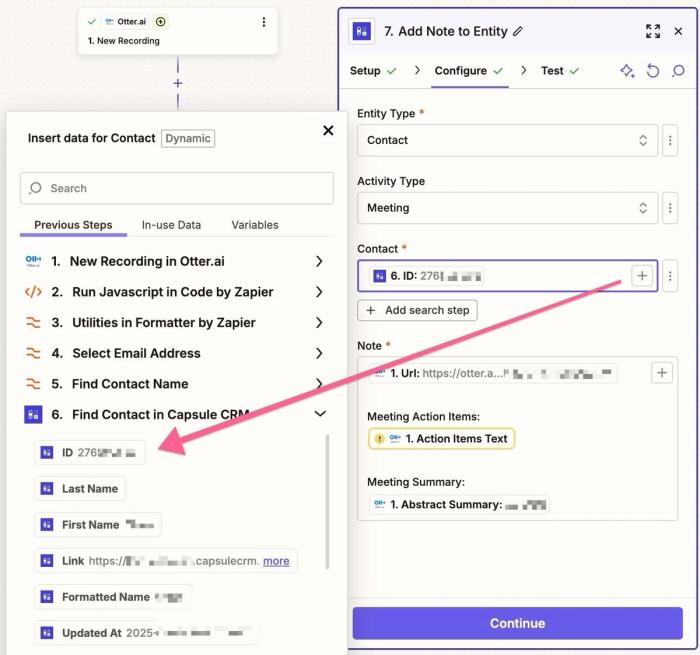
For the Note field, map the desired data from the Otter.ai trigger data. In the example above, the note added to Capsule will include a link to the Otter.ai recording, the Meeting Action Items, and also the Meeting Summary. Click Continue.
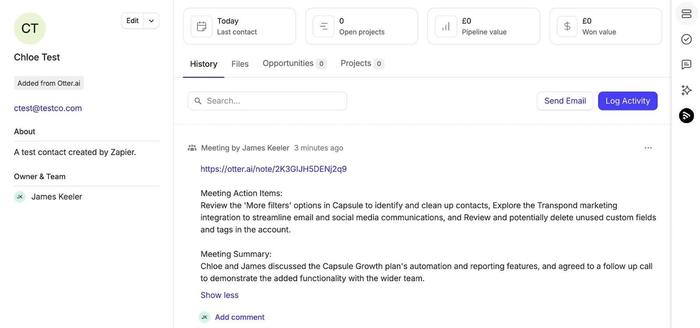
12. Test the Create Entry Step and Publish
On the Test page,select Test Step and verify that a note containing the transcript has been created in Capsule on the correct contact's record. Below, we can see that the Zap has successfully created a new contact in Capsule, tagged the contact, and also added a note containing the selected Otter.ai meeting transcript details.
Once the test is successful, turn the Zap on by clicking Publish This activates the integration, and from this point onward, any newly finished Otter.ai recordings will automatically create a note in Capsule CRM.
Benefits of this Integration
- Reduce manual data entry: Automating admin saves time, reduces errors, and keeps your team focused on valuable tasks instead of copy-pasting.
- Improve record-keeping: Ensures that a complete, searchable record of every important conversation is stored directly within your CRM.
- Create a single source of truth for sales data: Centralized customer meeting data enables smarter decision-making and better team collaboration.