The Mailchimp integration in Capsule helps you add contacts from Capsule to Mailchimp where you can use them for email campaigns and using the additional webhooks integration, new Mailchimp subscribers will be added as contacts in your Capsule account and if they unsubscribe they’ll be tagged accordingly in Capsule.
The integration is a great way to ensure that the contacts you’ve been tagging and customizing in Capsule get added to the right audience in Mailchimp and with all the details needed to send out the relevant marketing to them. Getting information fed back into Capsule as well means that you can keep track of who has unsubscribed which your sales team can then further act on.
What does the Mailchimp integration do?
The Mailchimp integration comes in two parts:
The regular Mailchimp integration which lets you add lists of Contacts from Capsule directly into an audience in Mailchimp. The Mailchimp Webhook Integration which is only available on all paid plans. This is enabled on a per-list basis. Once this is setup, it will automatically add new Mailchimp subscribers as Contacts in Capsule and when a subscriber is updated in Mailchimp their corresponding Contact in Capsule will get a note detailing the update and a Task for you to check the update. If they decide to unsubscribe from your list then the tag Mailchimp:unsubscribed will be added to the Contact in Capsule.
How to enable the regular Mailchimp integration
Any Administrator in Capsule can set up the Mailchimp integration.
- In Capsule, go to Account SettingsIntegrationsMailchimp and click the button to Configure Mailchimp.
- Choose the option to Connect to Mailchimp. You will now be asked to log in to Mailchimp to give Capsule access to your Mailchimp account. The integration is now up and running.
How to use the regular Mailchimp integration
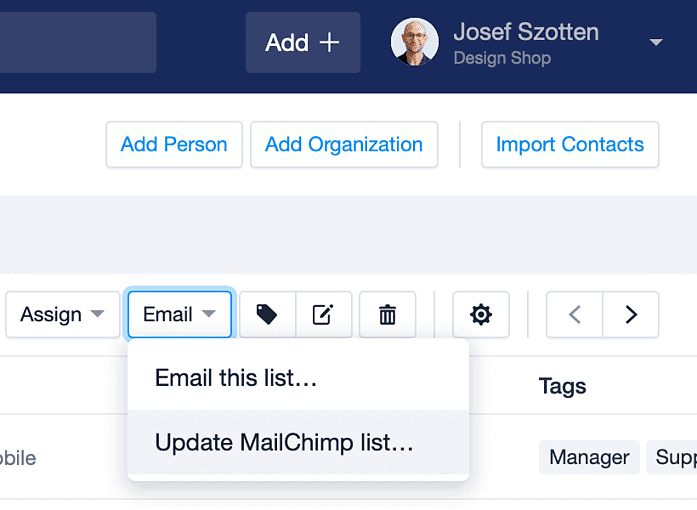
Once the Mailchimp integration is enabled, a new option will appear both in the normal contact menu and in the ‘Email’ menu from the contact list view.
1. Go to People & Organizations > select or filter for a list of contacts that you’d like to add to Mailchimp
2. Use the Email button and then click on Update Mailchimp list

3. Then click on the button to Update list next to the audience that you’d like to update with the list from Capsule
Using this option will add any Contact that weren’t already a subscriber and update any existing subscriber with any new details from Capsule.
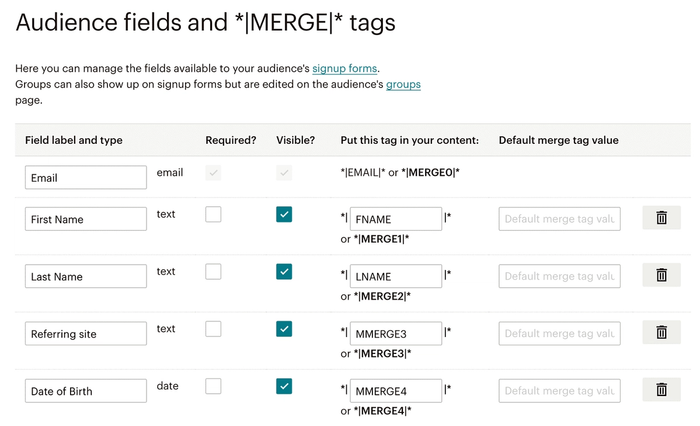
If you have setup extra |MERGE| tags in Mailchimp then you might be asked to map the corresponding fields from Capsule to them to make sure data is added correctly. Read more about how to ensure data from Capsule is added correctly to Mailchimp here.
How to get tags from Capsule into Mailchimp
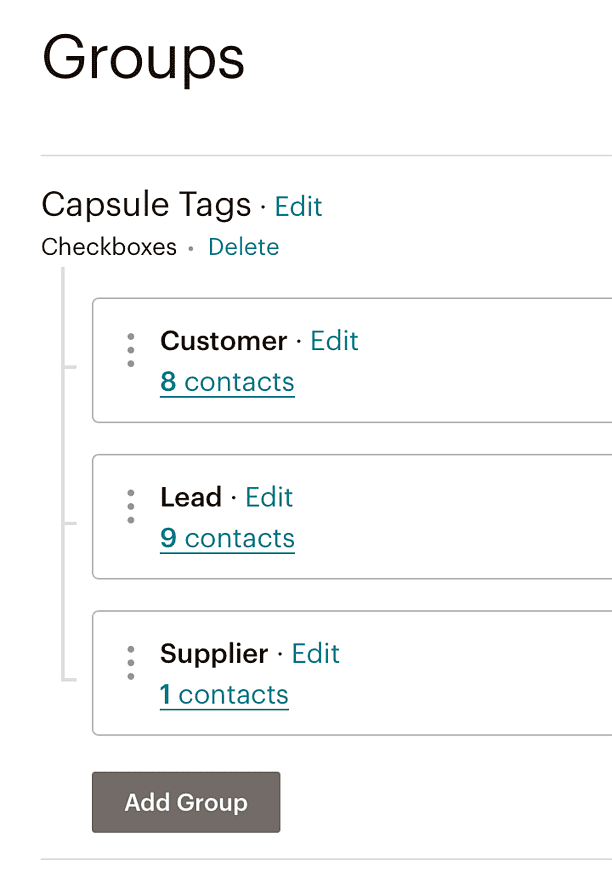
Tags in Capsule correspond to Groups in Mailchimp. Custom Fields in Capsule correspond to |MERGE| tags in Mailchimp
Once a tag is setup in Capsule you need to setup a corresponding group in Mailchimp. To do that:
- Login to Mailchimp and go to the audience you're using
- Go to Manage Audience > Manage Contacts > Groups
- Use the button to Create groups
- Now give the group a category name such as ‘Capsule Tags’ for example
- Then add a group name for each tag name you want to come through from Capsule
- Click Save and you’re done.

Once that’s setup, the next time you add contacts from Capsule to Mailchimp, any contact that is tagged with a tag that has a corresponding group in the audience in Mailchimp will be assigned to that group automatically. You can then use the group in Mailchimp to further segment your subscribers.
How to get custom fields from Capsule into Mailchimp
If you want to get custom field information from Capsule into your audience in Mailchimp to help you segment your subscribers based on that information you first need to setup corresponding |MERGE| tags for them in Mailchimp. The Capsule integration supports the following |MERGE| tags:
- Text
- Date
- Drop down lists
- Address (for the complete address from Capsule)
- Website
- Phone
For custom text, date and list fields make sure that the field label in Mailchimp matches exactly the custom field name in Capsule and for list fields make sure that each list option matches exactly as well.


Problems adding contacts to Mailchimp
When adding contacts from Capsule to Mailchimp it’s up to Mailchimp to decide if a new subscriber is valid or not. Mailchimp will let Capsule know if they deem a contact valid or not and when they do, that contact will be tagged with Mailchimp:invalid. However they won’t say why a specific contact is deemed invalid. There are however a few different reasons why that could be:
- The contact doesn’t have an email address on it at all. Mailchimp requires all contacts to have an email address.
- The contact doesn’t have a valid email address e.g. it’s missing an @-sign or a .com on the end.
- The contact has a role-based email address. A role based address is any email that starts with admin@... or support@... for example. See Mailchimp’s full list here.
- The subscriber is flagged as cleaned in Mailchimp. That means it has hard bounced. Check out their article for the difference between hard and soft bounced.
- There’s a required field in the Mailchimp list that isn’t met by the details coming through from Capsule.
- You have an ‘Address’ |MERGE| tag in Mailchimp and the address on the contact in Capsule isn’t complete. All address fields including state and country needs to be populated for the contact to come through.
How to enable the Mailchimp Webhook integration
Any Administrator in Capsule can set up the integration. The Mailchimp Webhook part requires that you have first enabled the normal Mailchimp integration as per the steps above.
To enable the Mailchimp Webhook integration:
1. Login to Capsule and go to the Account SettingsIntegrationsMailchimp and switch to the Mailchimp Webhooks tab
2. From this page you’ll see a list of all your Mailchimp audiences.
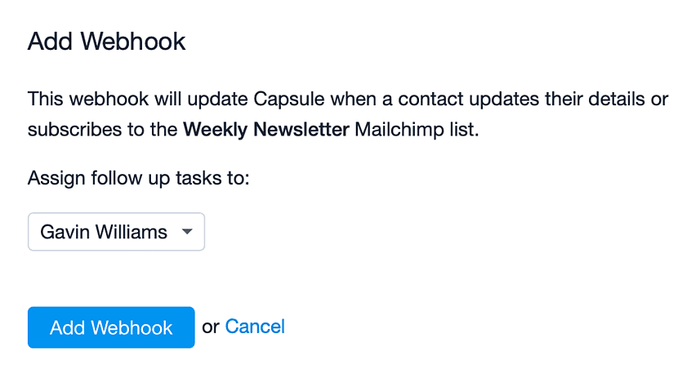
3. Click Add Webhook next to the audience(es) that you want to enable it for.

4. Select the user on your account who will be assigned the follow-up tasks and then confirm by clicking on Add Webhook.

How to use the Mailchimp Webhook integration
Once the Mailchimp Webhook integration is enabled it will automatically bring new Mailchimp subscribers into Capsule and any time an existing subscriber is updated in Mailchimp, a note is added to their corresponding contact in Capsule. For any of these types of updates a task is also added to the contact for you to check the addition/update and make sure things are setup correctly.
If a contact unsubscribes from an audience in Mailchimp then they’ll be tagged with Mailchimp:unsubscribed
These updates will only come through for subscribers that are added/updated by the subscriber themselves, either though a Mailchimp form or by using a Mailchimp link to update their subscription preferences.
Additions or updates made by a Mailchimp admin or via the Mailchimp API will not come through to Capsule. If this is something you need, please contact Capsule Support to get more help.