Once you have created a sales Opportunity, you want to make sure you use it to its full potential. Most important are things like keeping track of all communication around a sale and making sure everything you need gets done . The history section on the Opportunity is where you can add notes and store emails about the Opportunity. Notes can be minutes from a meeting you’ve had about the Opportunity or details from a phone call with the potential customer. In the panel on the right hand side, you can setup standalone tasks for any action that needs to be done. Above the history, you have the ‘Tracks’ section where all your tracks will be shown, helping you complete all tasks in the order that they need to be done.
How to streamline Opportunities using Tasks and Tracks
Depending on what you need to get done, you can add standalone Tasks or use a predefined set of tasks in a Track for more standardized workflows.
Manage your To-Do's for Opportunities such as sending an quote or following-up with a call using Tasks. Tasks can also be repeating, so if this is something you do on a monthly basis you can set up your task to repeat every month.
Tasks can be added on the fly by clicking the Add Task button on the right hand side of an Opportunity.
Tracks are a predefined set of Tasks unique to your business. They can quickly be applied to an Opportunity and allow you to see all of the relevant tasks to be completed to meet your deadlines.
You can apply an existing Track to an Opportunity:
- By selecting it from the Track drop down box when first creating an Opportunity.
- When viewing an Opportunity record you'll see the option to Add Track.
When adding a Track to an Opportunity you may be asked to select an end date for when you would like the list of Tasks to be completed. Tasks within this Track will be given due dates based on the date selected to meet your goals.
Selecting an end date
How to edit an individual Opportunity
Over the lifetime of an Opportunity, you may find that you need to update details such as the expected value or its expected close date, or you might need to change the owner of the Opportunity.
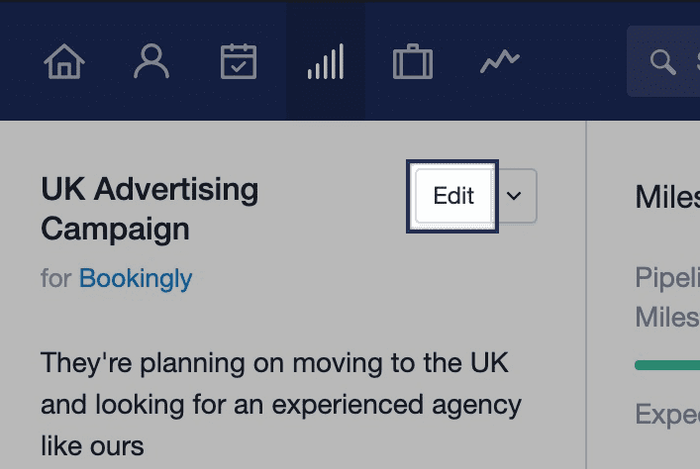
Go to the Opportunity record and click on the Edit button next to the opportunity name.
Updating multiple Opportunities through an Import
Sometimes you may want to make updates to multiple Opportunities at once, which can be done through an import. The file you import needs to have certain fields which match existing Opportunities in Capsule for the update to work.
The easiest way to do this is to export a list of your Opportunities, adjust the values you want to change and then re-import the same file. This ensures that the correct Opportunities are being updated.
Step 1: Exporting your Opportunities from Capsule
First, you'll start by gathering a list of your Opportunities:
- Start by navigating to the Sales Pipeline tab and filter your list of Opportunities to get the list you'd like to update.
- Then select Export at the right-hand of the page.
- In the popup, make sure All columns is selected. Choose either the CSV or Excel option, and click Export.
Step 2: Organizing your CSV or Excel file
Once you have your list of Opportunities, you can edit your CSV or Excel file. Open up the downloaded file in a spreadsheet and you will be best to delete most of the columns. We’ve covered some common examples below.
By default, the duplicate checker uses the Opportunity ID to update the fields, so this is a required field. In the spreadsheet, you should only keep these columns:
- Opportunity ID
- The column(s) for the field you want to update
Changing the status e.g to Won/lost
The key to setting an Opportunity as Won or Lost is the Milestone field.
- To set an Opportunity to Won: Change the Milestone field of that row to Won.
- To set an Opportunity to Lost: Change the Milestone field of that row to Lost.
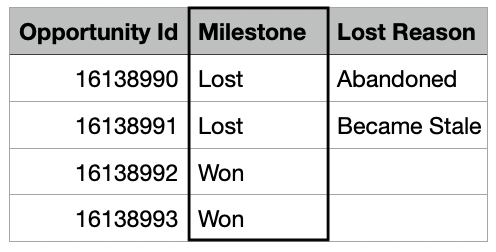
The above example, also adds a column to set the Lost Reason. To see all of the available fields for Won and Lost Opportunities, read more in this article.
Changing the Milestone or Pipeline
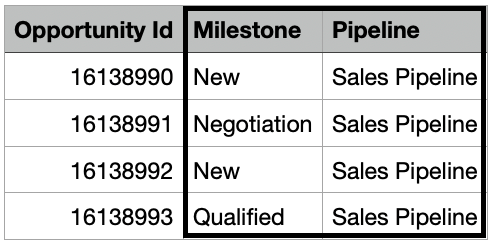
If you want to change these details for an Opportunity, the fields to focus on are Milestone and/or Pipeline (depending on what you would like to edit).
You should make sure the Milestone and/or Pipeline exactly matches your settings in Capsule. These details can be found in Account Settings > Sales Pipelines.
Updating the value in a Custom Field
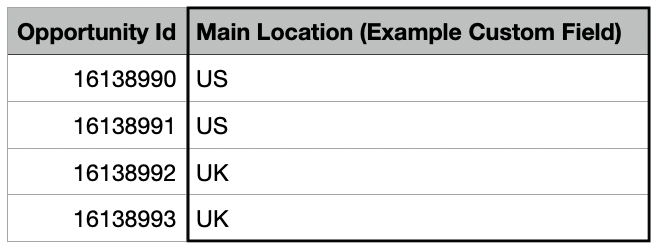
To change the Value of a Custom Field, clear the current entry in that row and add the new details. If it’s a List-type for example, you should make sure the entry matches what you have set up in Account Settings > Custom Fields.
In the below example, the field is called Main Location:
Updating the primary contact
When updating the primary Contact of the Opportunity the simplest way to do this is by updating the Contact ID field. This can be found in the URL bar of the contact in Capsule:

Which you can then paste into the Contact ID field in your spreadsheet:
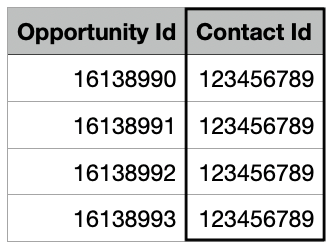
When importing, make sure to map that field to the Contact Name/ID in Step 3 - Importing back into Capsule.
Step 3: Importing back into Capsule
Once you've made your changes to the file, go back into Capsule and import:
1. Select Import Opportunities on the Sales Pipeline tab
2. Click From a File then choose the Opportunities option. Click to upload or drag and drop your file into the box
3. You will now need to map each column from the file to the relevant fields in Capsule. Make sure the Opportunity ID column in your spreadsheet is mapped to Opportunity ID.
4. In the next step you get to preview a sample of the import. Once you're happy, click Next.
5. Choose the option to Import and update duplicates using the data from your file. If it applies, also check the checkbox which says overwrite name, milestone, pipeline, contact & custom fields.

6. Finally click Import Now. Your import will start and you will be notified via email when it's complete.
How to reopen a Closed Opportunity
If you need to reopen an opportunity for any reason go to the list of Closed Opportunities, click the Opportunity name then click the button to Re-Open Opportunity. The Opportunity will now be reopened to the milestone it had before it was closed and it will be visible again in the Sales Pipeline.
How to duplicate an Opportunity
If you frequently create the same Opportunity for a particular Contact, you can use the option to duplicate the Opportunity in order to save time entering information over and over again. To do that, go to the individual Opportunityuse the Actions MenuDuplicate
When duplicating an existing Opportunity the Opportunity name, linked Contact, Pipeline, Milestone, expected value and payment terms will all be carried over to the new Opportunity.
Closing Opportunities
Administrators can close a list of Opportunities in bulk (mark as Won/Lost). To do this:
- Start by navigating to the Sales Pipeline tab list view and filter your list of Opportunities to get the list you want to close
- To select multiple opportunities, use the check boxes (or the select all box) on the left
- Select the Close button on the right of the filter menu. Here, you can use the Status dropdown to select Won or Lost and save your changes

Exporting Opportunities
When exporting a list of Opportunities, you can choose to export it as a CSV or Excel file. Please note, this is available for Users who have the Allowed to export records to CSV or Excel permission checked in their Profiles.
First, you'll start by gathering a list of your Opportunities:
- Start by navigating to the Sales Pipeline tab and filter your list of Opportunities to get the list you'd like to update
- Click the checkbox in the top left of the list to select all Opportunities
- Then select Export at the right-hand of the page
- In the popup, make sure All columns is selected. Choose either the CSV or Excel option, and click Export
Deleting Opportunities
All users are able to delete a single Opportunity, users with Administrator user role can also delete a list of them in bulk. Deleted Opportunities can be found in the Trash area, where they will be held for 30 days and can be restored by your Super Administrator if needed. We cover both ways of deleting Opportunities in the sections below.
How to delete an individual Opportunity
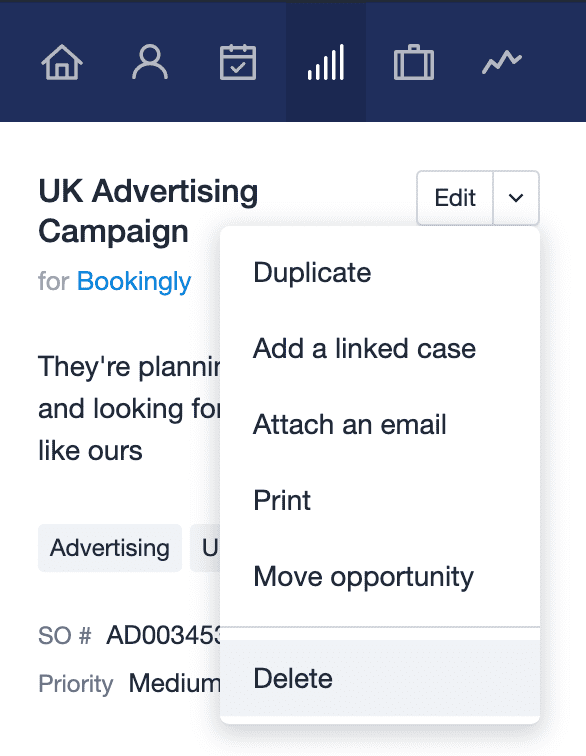
If you no longer need a specific Opportunity or if it has been created in error, you can delete it by going to The individual OpportunityActions MenuDelete
How to delete a list of Opportunities
Administrators can delete a group of Opportunities in bulk. To do this:
- Start by going to the Sales Pipeline tab
- Here, you can filter for the Opportunities you would like to delete
- Use the Trash Can icon on the right-hand side to delete all Opportunties in that list
How to store emails on Opportunities
A part of managing a sales Opportunity will often involve email conversations. In order to keep all communication about the Opportunity in one place, you can BCC and forward emails to the Capsule drop box and in turn store them against the sales opportunity that they relate to. There are a few different ways of doing this.
Linking an email from a Contact
You can store an email as normal using the regular Capsule drop box address and then once it’s stored, click to edit the email on the Contact record and use the option to link it to an existing Opportunity for that contact.
1. Find the contact that the email is stored on
2. Hover over the three dots icon (to the top right of the email) > choose the Edit button

3. Use the option to link note to Project/Opportunity
4. Then choose the Opportunity you want to link it to and save it.
Drop down with your list of opportunities to link to
Storing an email directly on an Opportunity
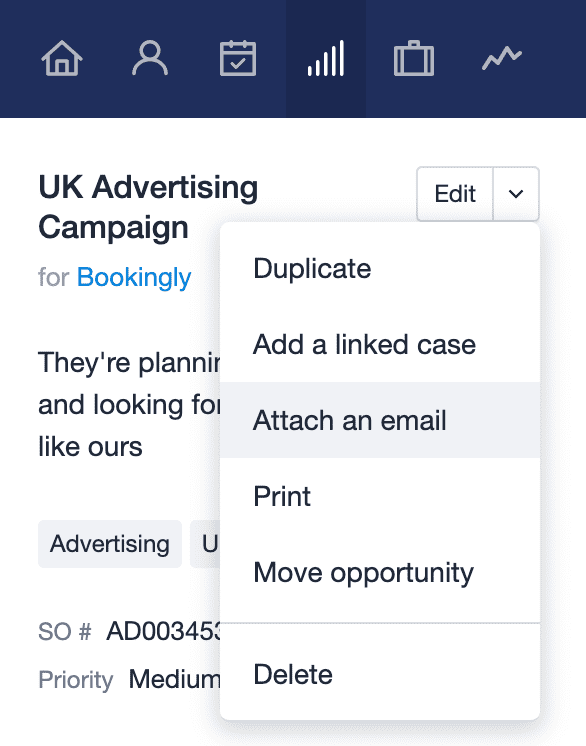
All sales opportunities have a unique drop box address that you can use to store emails directly on it. To find the address, you would do the following:
- Go to the Opportunity in question
- Click on the Actions Menu next to the Opportunity name and choose the option to Attach an Email.
- Then copy the email address that is displayed and use it to BCC or forward emails to. These still need to be email conversations between a Capsule user and a contact.
- Those emails will be stored directly on the opportunity.
Creating a new Opportunity with an email
If you are sending or have received an email that you want to use as a start of a sales Opportunity, then you can BCC or forward the email to a dedicated drop box address to create a brand new Opportunity from the conversation. The email subject will be used as the name of the Opportunity and the Opportunity will be linked to the Contact that the email conversation is for. If the Contact doesn’t already exist, then one will be created for it in the process. Here’s how to do this:
- Click on your name in the top menu bar in Capsule > My Preferences
- Go to Mail Drop Box
- Copy the drop box address but replace the word dropbox@ with opportunity@ and then use it to BCC or forward an email to.
How to log activity on an Opportunity
For any communication or details that isn’t in an email, you can use the option to Log Activity on the Opportunity. It lets you write down details from a meeting or other information that is important to record on the Opportunity. On the Free and Starter plans, there are three types of Activities you can add:
- Note
- Meeting
- Call
On the Growth, Advanced and Ultimate plans you have the ability to setup your own custom activity types to help you categorize your activities further.
These activity types will in turn be used in the Activity Type reporting which helps you see a breakdown of activities by user and type. We have more details on this in our Business Insights article.
How to link an Opportunity to a Project
Winning a sale can be the start of your process. Using Projects allows you to manage the next steps.
Depending on your industry and company size, you could have different departments working on different stages of a deal. You can link a Project with an Opportunity in order to bridge the gap between pre and post-sale activities.
To do this:
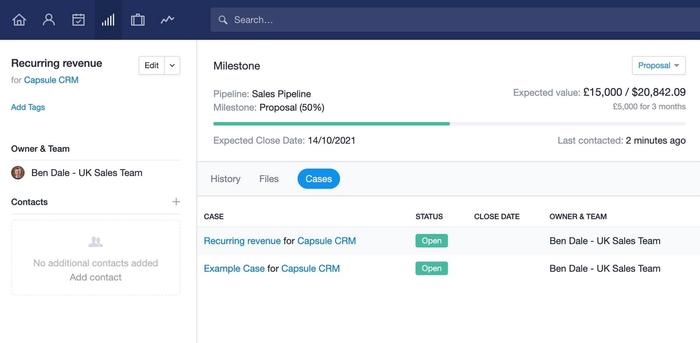
- Use the Actions menu next to the Opportunity name
- Select ‘Add a linked Project.
- This will take you to a ‘New Project' form where you can fill in the details for the Project you want to create for it.
- Once saved, the Project will be visible in the 'Projects' tab for the Opportunity and on the Project itself you’ll see it visible under the heading for 'Linked Opportunity Details'.
If you’d like to link an existing Project to an Opportunity then we have more details on that in our article on Managing Projects.
How to use an Opportunity with a 3rd party service
Once an Opportunity has been created you can use it to generate content in a 3rd party service using something we call Generated Links. A Generated Link is a URL, often to a service outside Capsule where you can use information from the Capsule record to make up the link.
For example, if you want to create a quote in Quotient, you can add the URL for new Quotient quote which uses details from the Opportunity in Capsule and populates them in the fields in Quotient. The link would look like this: https://go.quotientapp.com/new-001/quote?title={name}&email={email}
The {name} part will use the name of the Opportunity and fill it into the title of the quote and the {email} part will take the email address for the main contact linked to the Opportunity and fill it into the recipient email address for the quote.
Links like this rely on the 3rd party service (in this case Quotient) to support filling in details through the URL. Not all services do so please check with your provider if it’s an option before setting one up.
You can read more about Generated Links in the section on enhancing Capsule.