TimelinesAI is a tool for synching and managing multiple Whatsapp profiles in one centralised location. With the support of Zapier, you can integrate Capsule with TimelinesAI - so that triggers in either tool will automate actions in the other. This article will cover some helpful Zap ideas.
Prerequisites
Before starting, you will need:
- A Capsule account
- A Zapier account on a plan that allows multi-step Zaps
- A TimelinesAI account
How to set up a TimelinesAI to Capsule Zap
Zapier works with Triggers and Actions - this means you can set up a Trigger in TimelinesAI and then an Action in Capsule based on this. Click the right link below for the instructions to set up your Zap:
- How to add a note to a Capsule Contact from a recieved message in TimelinesAI
- How to add a note to a Capsule Contact from a sent message in TimelinesAI
- How to send a message in TimelinesAI when a Capsule Opportunity is Won
How to add a note to a Capsule Contact from a received message in TimelinesAI
Setting up this Zap is an easy way to save time - by making sure every new message you receive in TimelinesAI is automatically added as a note to an existing Contact in Capsule. You can also set it up to create a new Contact in Capsule if they don’t already exist.
We have created a template to make the process as simple as possible
Click the link above to get started, then follow the steps below:
Define the Zap Trigger: New Received Message
1. In the template, click on the tile for New Received Message
2. In the Account field on the same page, choose Sign In to link Zapier to TimelinesAi - or select an already existing TimelinesAI connection.
If you are asked to Sign in, Zapier will ask you for an API token from TimelinesAI. Go to this page and generate a token. Once generated, click on the token to copy it to your clipboard, then paste it back into Zapier.
3. At this point, you will be asked to Test your Trigger. Use the Test Trigger button to complete the check - here, you will be able to see an example of the information from your leads
4. Select one of the examples, then choose Continue with the selected record to take you to the next step
Define a Find Step
1. On the next step, in the Account field, choose your Capsule account. If you’ve set up a Zap for Capsule earlier, you’ll be shown an existing account. Or follow the instructions to link your account and click Continue
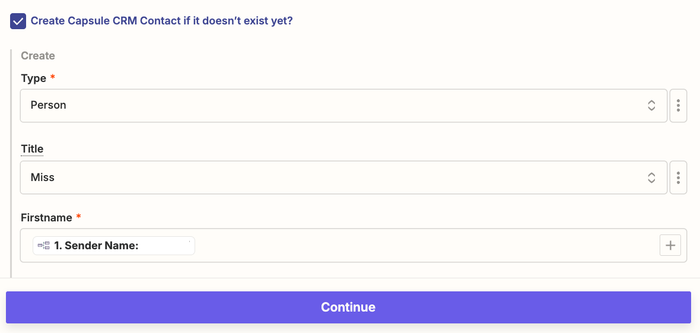
2. Tick the option to Create Capsule CRM Contact if it doesn’t exist yet? shown below.
You only need to map the relevant Fields, we’d recommend that you include Type, Firstname, Number and Email Address (if available) - the other fields will be optional. Once you’ve reviewed the configuration, click Continue
3. Now you will be asked to test this step. Click Test Step to complete it
4. In the results, you’ll see a Contact ID for the Contact, that will be used to Define the Action next.
Define the Zap Action: Add note
1. On the next step, in the Account field, make sure your existing Capsule account is selected and click Continue
2. You will see a Contact ID in the Contact Field and the message itself in the Note field. Click Continue
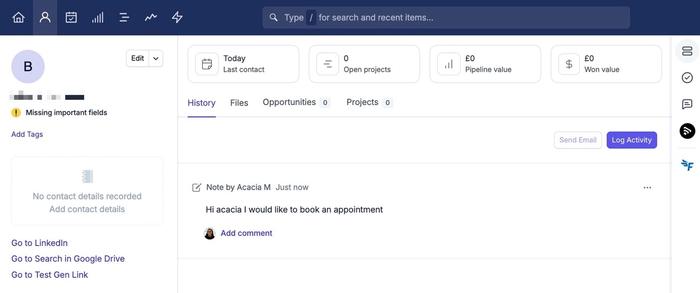
3. At this point, you will be asked to Test your Step. Use the Test Step button to complete the check - this will add a note to the Contact in Capsule (and create the contact itself, if it doesn’t already exist).
If successful, you’ll see a note in the contact in Capsule:
4. When you’re happy with the result, click the Publish button to save your changes and push your Zap live.
How to add a note to a Capsule Contact from a sent message in TimelinesAI
Setting up this Zap is an easy way to save time - by making sure every new message you send in TimelinesAI is automatically added as a note to an existing Contact in Capsule. Just like the above Zap, you can also set it up to create a new Contact in Capsule if they don’t already exist.
We have created a template to make the process as simple as possible
Click the link above to get started, then follow the steps below:
Define the Zap Trigger: New Sent Message
1. In the template, click on the tile for New Received Message
2. In the Account field on the same page, choose Sign In to link Zapier to TimelinesAi - or select an already existing TimelinesAI connection.
If you are asked to Sign in, Zapier will ask you for an API token from TimelinesAI. Go to this page and generate a token. Once generated, click on the token to copy it to your clipboard, then paste it back into Zapier.
3. At this point, you will be asked to Test your Trigger. Use the Test Trigger button to complete the check - here you will be able to see an example of the information from your leads
6. Select one of the examples, then choose Continue with selected record to take you to the next step
Define a Find Step
1. On the next step, in the Account field, choose your Capsule account. If you’ve set up a Zap for Capsule earlier you’ll be shown an existing account. Or follow the instructions to link your account and click Continue
2. Tick the option to Create Capsule CRM Contact if it doesn’t exist yet? shown below.
You only need to map the relevant Fields, we’d recommend that you include Type, Firstname, Number and Email Address (if available) - the other fields will be optional. Once you’ve reviewed the configuration click Continue

3. Now you will be asked to test this step. Click Test Step to complete it
4. In the results, you’ll see a Contact ID for the Contact, that will be used to Define the Action next.
Define the Zap Action: Add note
1. On the next step, in the Account field, make sure your existing account is selected and click Continue
2. You will see a Contact ID in the Contact Field and the message itself in the Note field. Click Continue
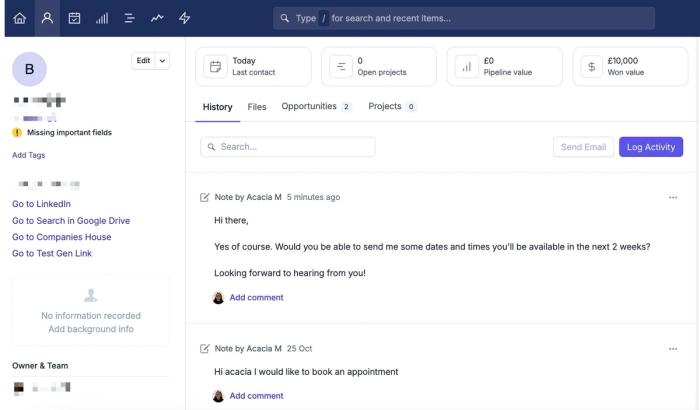
3. At this point, you will be asked to Test your Step. Use the Test Step button to complete the check - this will add a note to the Contact in Capsule (and create the contact itself, if it doesn’t already exist).
If successful, you’ll see a note in the contact in Capsule:
How to send a message in TimelinesAI when a Capsule Opportunity is Won
Setting up this Zap is a simple way to keep your Contacts updated - so that when a Capsule Opportunity is marked as Won, this will send a new message to the primary contact via TimeslinesAI.
Click the link above to get started, then follow the steps below:
Define the Zap Trigger: New or Updated Opportunity
1. In the template, click on the tile for New or Updated Opportunity
2. In the Account field, choose your Capsule account. If you’ve set up a Zap for Capsule earlier you’ll be shown an existing account. Or follow the instructions to link your account and click Continue
3. On the Configure tab, click Continue
4. At this point, you will be asked to Test your Trigger. Use the Test Trigger button to complete the check - here you will be able to see an example of the information from your Opportunities
5. Select one of the examples, then choose Continue with selected record to take you to the next step
Define a Zap Filter: Won Opportunity
1. On the next step, click Continue
2. At this point, you will be directed to the Configure & test tab. Use the Continue button to complete the check - you will be shown a message if this was successful:
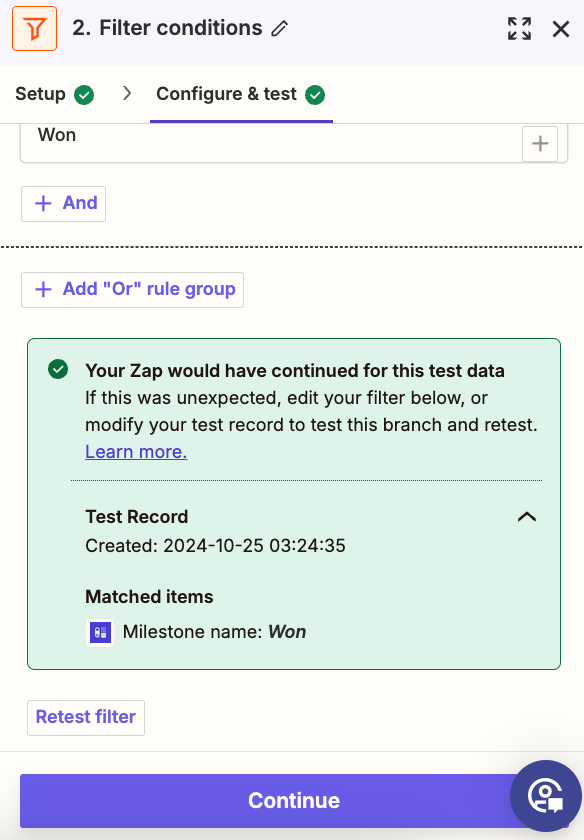
3. If successful click Continue
Define a Find Step
1. On the next step, in the Account field, choose your Capsule account. If you’ve set up a Zap for Capsule earlier you’ll be shown an existing account. Or follow the instructions to link your account and click Continue
2. On the Configure tab, click Continue
3. Now you will be asked to test this step. Click Test Step to complete it
4. In the results, you’ll see a record ID for the Contact, which will be used to Define the Action next.
Define the Zap Action: Send TimelinesAI Message
1. In the Account field, choose Sign In to link Zapier to TimelinesAi - or select an already existing TimelinesAI connection.
If you are asked to Sign in, Zapier will ask you for an API token from TimelinesAI. Go to this page and generate a token. Once generated, click on the token to copy it to your clipboard, then paste it back into Zapier.
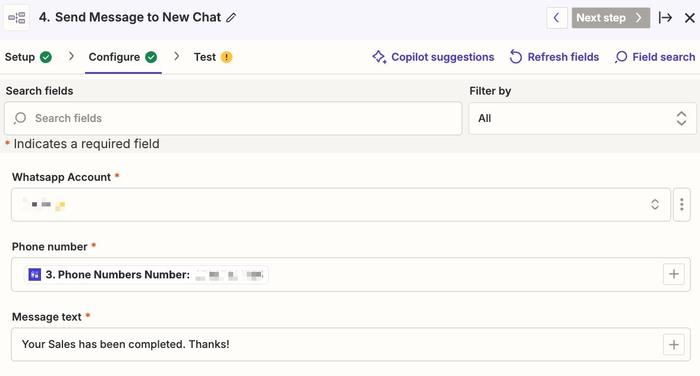
2. On the Configure tab, set the following and then click Continue:
- Whatsapp Account = Select the account the message will be sent from in TimelinesAI
- Message Test = Add the message body
3. At this point, you will be asked to Test your Step. Use the Test Step button to complete the check - this will send a message via Timelines to the primary contact of your Capsule Opportunity.
4. When you’re happy with the result, click the Publish button to save your changes and push your Zap live.