Capsule’s simple, powerful CRM makes it easy to manage your business relationships, sales pipeline and customer projects. But when you’re faced with a blank slate, it can be tricky to know where to start.
Hi, I'm Keith, the Customer Success Lead at Capsule: I help our customers to get started and make the most of our CRM. It can be incredibly daunting to adopt a new CRM, and not knowing where to start can be off-putting.
So I've put this guide together to help you get set up quickly and efficiently with all my top tips. Follow this guide to get started and become a Capsule pro.
1. Choose a CRM champion
Configuring your CRM is a collaborative process, but the most successful accounts are those with a dedicated CRM champion. As a super admin, this person — usually the head of sales or someone in a similar role — is responsible for configuring Capsule and setting up other users. Some businesses choose to have two or three super admins, especially if they have a lot of data to manage.
It’s easier to set up your CRM when all the relevant users are involved from the start. With your CRM champion in place, you can start inviting other users to Capsule.
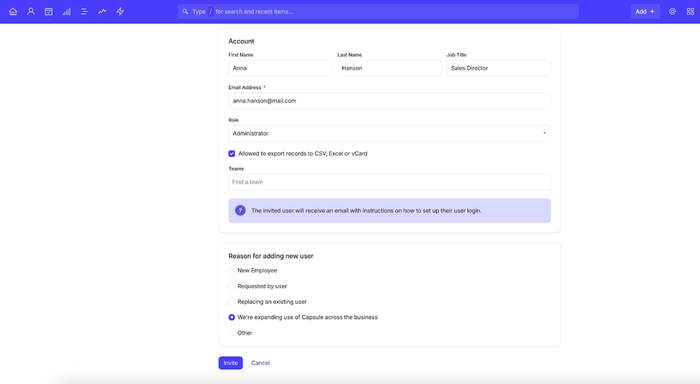
Before you start, it’s important to understand the different user roles in Capsule:
- Restricted user — Can view, edit, and delete records assigned to them. They don’t have access to unassigned records, or those assigned to other users or Teams.
- Standard user — Can view, edit, and delete unassigned records and records assigned to them or their Team.
- Administrator — Can view, edit and delete all records. Can also configure account settings, manage other users, bulk delete contacts, and manage Workflow Automations.
- Super administrator — Has the same permissions as an administrator, but is also responsible for restoring deleted records, paying the subscription fee, and ensuring users meet the customer terms.
2. Check the data you want to import
Whether you’re switching to Capsule from a different CRM or importing from a spreadsheet, now’s a great time to review your data. Checking this before you begin ensures you’re only bringing the most relevant, accurate data with you.
You might think all your historical records are necessary. But a new CRM is a chance to clean up your data and make sure that you only store the most relevant and up-to-date information. That’s why we suggest reviewing your contacts, opportunities, and other data before you import it to Capsule.
Explore the risks of poor data hygiene, and what you can do to keep your data clean.
3. Create Custom Fields
Every business is different, which is why we’ve built Custom Fields into our CRM. Custom Fields allow you to capture and record the data you need to make sales and maintain strong customer relationships.
Adding Custom Fields upfront personalizes your templates for contacts, Opportunities, and Projects. You’ll also be able to add any missing Custom Fields on import so all your data is organized the way you want it to be. You can then use Custom Fields to filter records in the future, improving visibility and making reporting easier and more efficient.
Cross-reference the standard fields in Capsule with the information you capture in your existing CRM. Add any missing fields as Custom Fields before importing your data to ensure seamless migration. Popular Custom Fields include:
- Industry
- Organization size
- Signup or renewal date
- Services the prospect is interested in
- Business value or rating
- Lead source
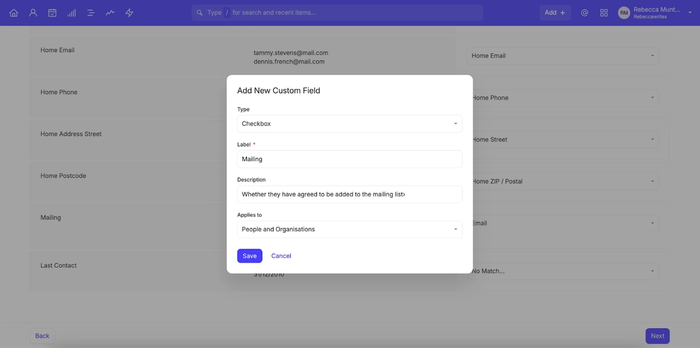
See how to add Custom Fields in this quick walkthrough video:
4. Define Tags
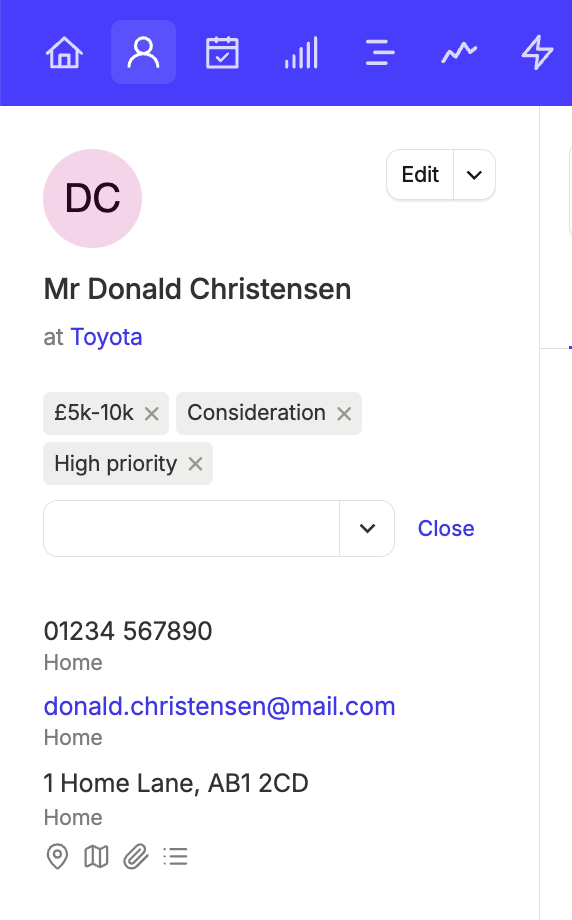
Tags act as labels you can apply to Capsule records for quick identification and filtering. Adding Tags is one of the best ways to organize your contacts, Opportunities, and Projects.
There are no preset Tags in Capsule. You decide which Tags are useful for your business, then create and apply these as needed.
Popular Tags include:
- Sales and marketing funnel stage
- Account value (for example, bronze, silver, and gold)
- Region or location
- Priority rating
By default, only administrators can add Tags when creating a contact, Opportunity, or Project. Standard users can then apply existing Tags to their own assigned records as needed. All users can filter records by Tags.
Tags can also be created as part of your initial upload. So think about which Tags will be useful to your business as it scales. Adding Tags at this stage can help keep records organized and give you better clarity over the data within your CRM.
Read more about our best practices for creating Tags and Custom Fields.
5. Personalize your pipeline and sales processes
Capsule’s standard sales pipeline is ready to go as soon as you first log in. But should you need to tweak this to fit your sales processes, our sales pipeline is completely customizable.
Only admins and super admins can make changes to the sales pipeline. Head to Account Settings > Sales Pipelines, where you’ll see a list of the standard pipeline milestones. You can archive these and set up new milestones, as well as changing the probability settings:
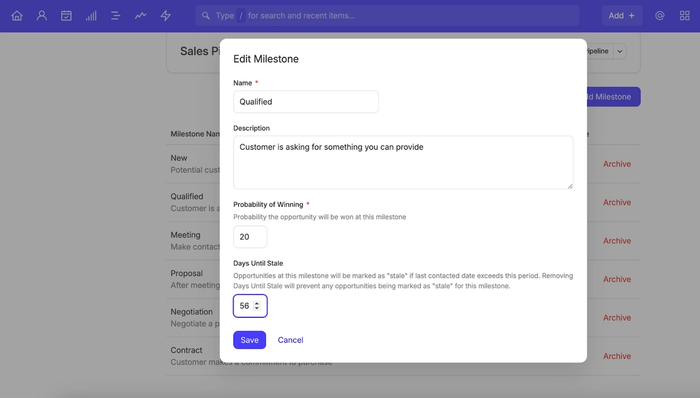
You can also set the window before an Opportunity becomes stale. By default, this happens if the next milestone isn’t reached within 14 days. Stale opportunities are highlighted orange within the pipeline to keep you informed and prevent them from becoming disengaged.
Businesses with a longer sales cycle may need to extend this 14-day window, while those with quicker processes can shorten them to keep prospects engaged.
Bonus tip: Set tasks automatically with Tracks
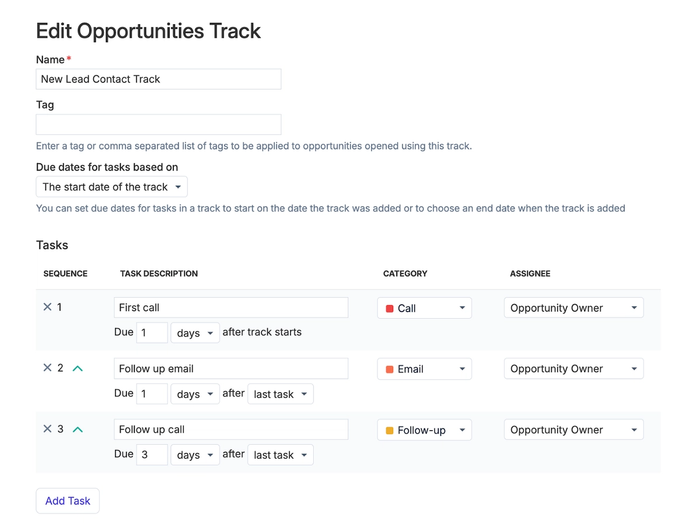
If your sales team follows a predefined set of actions when they’re assigned a lead, use Tracks to standardize this process. With Tracks, you can set up a sequence of tasks that every team member should follow, prompting them to regularly engage with leads to improve the chances of conversion.
Tracks minimize admin, giving your team more time to nurture relationships and convert prospective customers.
6. Import your data at the right time
While you can upload your data at any point, we recommend doing so after you’ve set up your Tags, Custom Fields and pipeline. That way, you can add and organize all your data in one import — you won’t need to go back through it later.
We have tons of useful guides on how to import and migrate data efficiently, so it’s worth looking through these to see the best option for you. There are five key ways to import data into Capsule:
- Upload via a spreadsheet.
- Migrate from another CRM via Import2.
- Manually migrate from another CRM.
- Import via Transpond.
- Integrate with an accountancy software.
Some import methods incur an extra cost (usually if you’re migrating from another CRM). The fee will depend on how much data you’re migrating, highlighting another great reason to clean up your data beforehand.
Uploading via a CSV or spreadsheet is free, but it may take a little time to ensure all your column headers are correct before importing. A popular method is to upload data via CSV, then integrate with an accounting software (such as Xero or Quickbooks), and sync your invoice data to the relevant contacts. This enables you to track the value of each customer within your pipeline over time.
| Account plan | Number of contacts |
|---|---|
Free | 250 |
Starter | 30,000 |
Growth | 60,000 |
Advanced | 120,000 |
Ultimate | 240,000 |
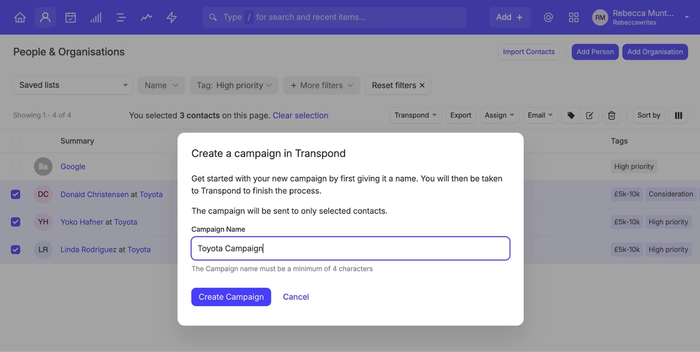
Bonus tip: Import data via Transpond
Transpond is Capsule’s marketing platform. With Transpond, you can create captivating email campaigns, social media posts and chatbots — but you can also use it to sync your Capsule contacts, Custom Fields, Tags and saved lists. Change contact status in bulk, or use filters to create a targeted Transpond campaign via Capsule:
7. Connect your email account
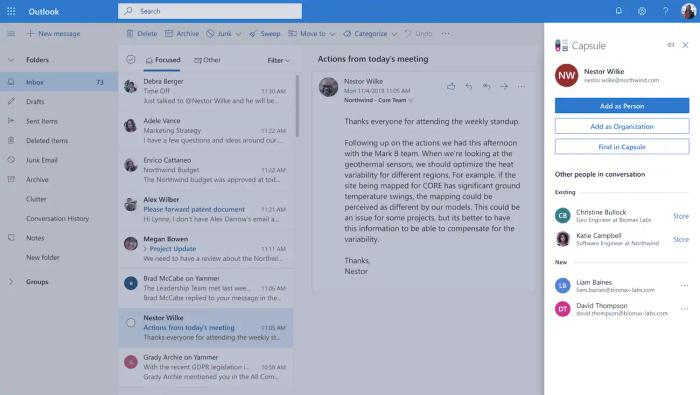
Tracking contact with prospects and clients has never been easier thanks to Capsule’s Gmail and Outlook integrations. Just connect your account, and Capsule will link email conversations directly with the relevant record. This makes it easy to see past conversations, especially if you need to reassign records. Connecting Capsule with familiar services can help your team adopt the software more quickly.
You can also build templates to send emails from within Capsule. These are sent via your Gmail or Outlook client, so the recipient won’t know it’s a template. This saves your team tons of time and ensures consistency throughout your messaging.
Alternatively, you can use the Gmail add-in or Outlook add-in to store customer emails in Capsule automatically. Plus, see any information Capsule has stored about a recipient from your email client:

It’s also worth familiarizing yourself with the Capsule Mail Drop Box which is unique to your account. If you don’t use Outlook or Google, the Mail Drop Box lets you add email conversations to the relevant records easily. Just BCC the Mail Drop Box email address in your email conversations, and Capsule will link it to the relevant record.
8. Connect your integrations
Centralize and simplify your day-to-day operations by connecting your Capsule account with other software you use regularly. Integrations reduce work duplication, saving teams time and ensuring data is consistent across all platforms.
We have dozens of integrations ready to go. Some of our most popular integration categories include:
- Accounting — including Xero, Quickbooks and Sage.
- Marketing — including Transpond, Mailchimp and FormStack.
- Customer support — including Zendesk, Web Forms and Akita.
If the integration you’re looking for isn’t available yet, consider using Zapier to automate tasks and data transfers, with thousands of platforms to choose from.
9. Create a Project Board
Where Opportunities are focused on revenue, Projects allow you to track client deliverables and all your work outside of sales. This makes Projects one of our most versatile features, and is often used for:
- Onboarding
- Account management
- Renewal
- Servicing and order management
Project Boards give you a template for project creation. Customize your Project Board to make it fit for purpose — add or archive stages depending on your project requirements.
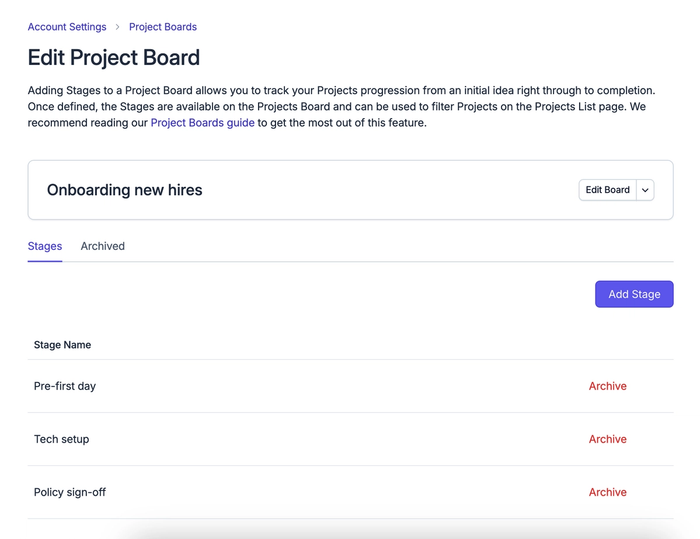
As with Opportunities, you can create Project Tracks. Tracks set clear actionable steps that will take the project from start to finish.
Bonus tip: Automate project creation
Skip manual Project setup with our Workflow Automations. For example, when you win a contract, you can automatically create an onboarding project for the new customer, assigning an account manager and the relevant tasks. It’s a simple way to save time and build seamless automation into your processes.
10. Get familiar with filtering
When your teams are actively using Capsule, you can start to become familiar with our filtering systems. Knowing how to filter and segment data effectively will help you make informed decisions and track your overall sales performance.
Capsule has several filter options, including Tags, Custom Fields, and Standard Fields. You can also filter by assigned user and Opportunity status (open, won or lost).
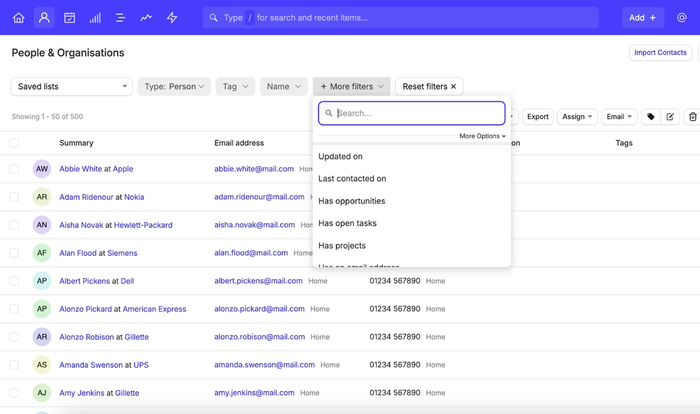
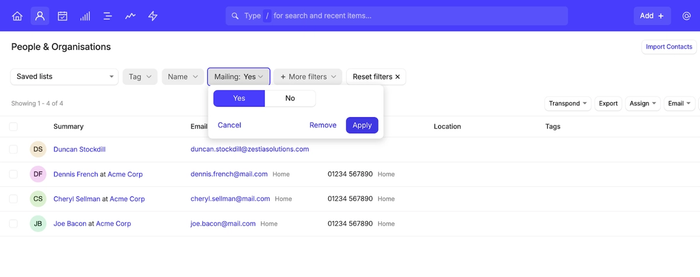
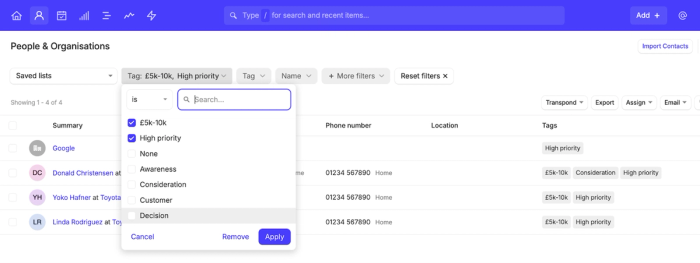
So far, so simple. But Capsule also offers advanced filtering features like dynamic saved lists to enhance your user experience. Dynamic saved lists allow you to save specific filters, and will update in real time based on changes in individual records. Keep lists private or share them with the rest of the team.
Filters help you segment records for easy targeting and follow-up. For example, create a segmented list of uncontacted leads, then assign the list to your team to follow up. When the list is empty, you’ll know each lead has been contacted. Additionally, you can create segments to receive specific marketing emails via Transpond.
Experiment with filters, lists, and segments to see how you and your team can benefit from them.
Our top tips, summarized
- Assign a CRM champion who has overall responsibility for configuring and managing Capsule. This will help you transition to Capsule and onboard users smoothly.
- Review your CRM data before importing it. Remove any unnecessary or outdated records before uploading.
- Create Custom Fields in Capsule based on the information that’s important for your business.
- Define Tags to organize, segment and filter records effectively.
- Customize your sales pipeline to reflect your sales processes. Use Tracks to auto-assign tasks to your sales team when an Opportunity is created.
- Import your data after you’ve configured your pipeline and set up any Custom Fields and Tags. This will keep all your data organized and segmentable from the start.
- Connect your Gmail or Outlook email client to Capsule to store conversations directly in the CRM.
- Make Capsule a seamless part of your tech stack by connecting any third-party integrations you need. Capsule enables 70+ integrations, including Transpond, Slack, Mailchimp, and more.
- Set up a Project Board to standardize the stages of each project. Customize the default Project Board to better fit your needs.
- Learn how to use filters effectively for email segmentation, lead follow-up, and other essential tasks.
Simplify sales admin with Capsule’s powerful CRM
All these tools give your team more time to perform the tasks that really matter — building relationships and generating revenue. Capsule cuts out the arduous admin tasks with simple yet powerful CRM tools.
I really hope you've found this guide useful, and look forward to welcoming you on Capsule soon.
To see how we can streamline your sales process and centralize account management, try Capsule for free. Stick with Capsule’s free plan or trial one of our paid plans free for 14 days.