Understanding the Mail Drop Box
The Capsule Mail Drop Box is an email address unique to your account which provides a convenient way to store email messages in one simple step when you send or receive an email.
How to store emails using the Drop Box
First you'll need to know your Drop Box address which has been automatically generated by Capsule. You can find it by clicking on your name in the top menu bar then selecting My PreferencesMail Drop Box
It will look something like this: dropbox@12345678.examplecompany.capsulecrm.com
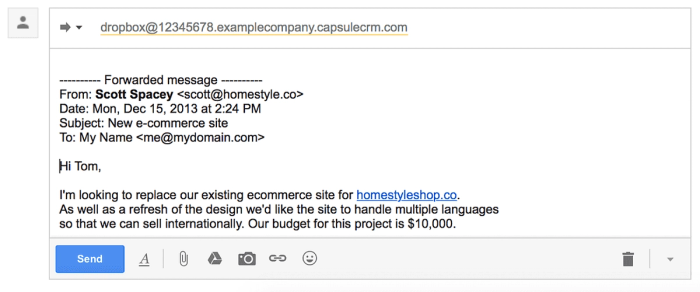
When you receive an email from a contact, forward the email to your Drop Box address and the email will be attached to the contact who sent it.
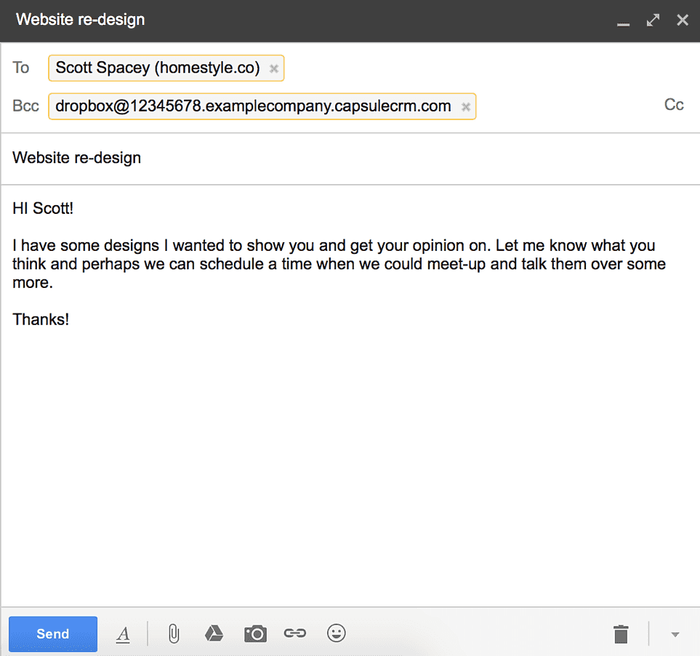
When sending an email to your contacts, BCC the Drop Box address and the email will be attached to the recipients.
Controlling where an email is attached
When you BCC or forward an email to the Drop Box, Capsule will automatically attach the email to each contact referenced in the email and auto-create contacts that don't already exist. Read more details about how the matching rules work here.
You can override the attachment rules before you send the email as follows:
Attaching an email to a specific Contact
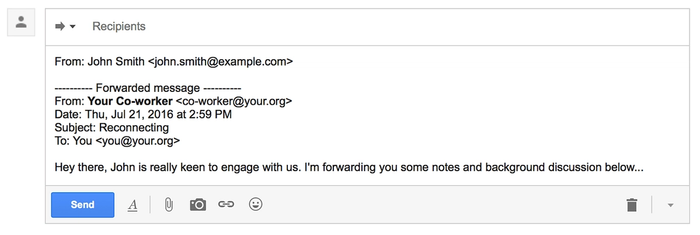
If for any reason you'd like to attach an email to a specific contact (i.e. a contact that isn't referenced directly in the email) there's a simple way to do this. Simply forward the email to the Drop Box but before sending, add a From: line to the start of the email using the email address of the contact you want to attach the email to, like so:
Attaching an email to a specific Opportunity
When you forward an email to the Drop Box, you can create a new Opportunity by replacing dropbox@ with opportunity@. It will look something like: opportunity@12345678.examplecompany.capsulecrm.com. Capsule will auto-create the new Opportunity, attaching the email and contact.
If you're using multiple sales pipelines then the Opportunity will be added to your oldest active Pipeline. If you want to specify which Pipeline to store it on then use pipeline+nameofthepipeline@.... You can read more about this in our Multiple Sales Pipelines article.
If you'd like to attach the email to an Opportunity that already exists, just open the Opportunity in Capsule and then from the Actions menu and select Attach an email action and Capsule will provide you with a specific Drop Box email address to use.
Attaching an email to a specific Project
When you forward an email to the Drop Box, you can create a new Project by replacing dropbox@ with project@. It will look something like: project@12345678.examplecompany.capsulecrm.com. Capsule will auto-create the new Project, attaching the email and contact.
If you'd like to attach the email to a Project that already exists, just open the Project in Capsule and then from the Actions menu and select Attach an email action and Capsule will provide you with a specific Drop Box email address to use.
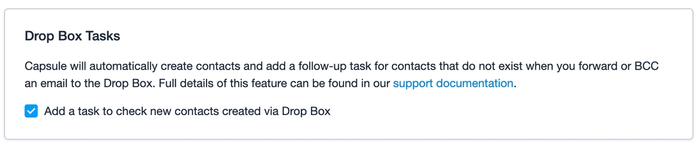
Check Contact created by the Drop Box Tasks
When a new Contact is created by the Drop Box a task is generated for the User who stored the email to 'Check contact created by the drop box'. The task is there to prompt the User to check the details of the newly created contact and make sure all of the necessary information is recorded and correct. For example, you might like to add a few details from the email signature into the contact, such as an address or phone number.
These tasks are created by default, however, each User on the account can choose whether they would like to disable the 'Check Contact' tasks. To do this:
- Go to My Preferences > Preferences
- Under the 'Drop Box Tasks' heading, uncheck the option to 'Add a task to check new contacts created via Drop Box' > Save Changes.
- Tasks will not be added for any new records created via the Drop Box by that User.
Starting a Track
When you forward an email to the Drop Box, you can start a Track by replacing dropbox@ with track+track name@. For a track called "welcomepack", it will look something like: track+welcomepack@12345678.examplecompany.capsulecrm.com.
Capsule will auto-create a new Opportunity or Project (depending on if the Track is for Projects or Opportunities), attaching the email and starting the Track.
If your Track name has multiple words e.g. 'Standard Sales Pitch' then simply remove the spaces when you use it in the Drop Box address e.g. track+standardsalespitch@12345678.examplecompany.capsulecrm.com
If the Track is setup to work backwards towards and end date then unfortunately you won't be able to create it via the Drop Box. Instead you'd be best to use the opportunity@... Drop Box address and then manually apply the Track from within Capsule.
Creating a follow-up task
To create a follow-up Task just replace dropbox in the email address with todo and the Drop Box will automatically create a follow-up Task for you, as well as attaching the email to the contact. Example address: todo@12345678.examplecompany.capsulecrm.com
If you'd like to set the Task as due tomorrow instead, simply add +tomorrow to the Drop Box address like this: todo+tomorrow@12345678.examplecompany.capsulecrm.com or if you'd like the Task to be due further in the future, add +[number of days]d for example: todo+7d@12345678.examplecompany.capsulecrm.com to create a Task that will be due in a week.
Troubleshooting
If you're having trouble with the Drop Box, here are a few things to check:
1. Capsule authenticates your email address before accepting any email to the Drop Box. Each email address you send from (your own email address) must be recorded against your user record in Capsule. To add or amend your email addresses see this article.
2. If you're forwarding an email inline to the Drop Box then it's important that you don't remove the forwarding header that is included at the top of the message. Capsule uses the email address in this header to identify which contact to store the message against. A normal forwarding header looks like this:
3. If you're having trouble storing your emails in Capsule when using Outlook, Apple Mail or Thunderbird then you are best to use the option to Forward as Attachment instead.
4. Capsule is designed to keep track of messages between you and your contacts. It won't store messages that are only between you and other users of your account.
5. If you still have a problem, please get in touch with a description of the problem you are having, the subject of the problematic email and the date & time you sent the message to the Drop Box.
Tips for using different email clients
Some email clients such as Outlook remove email addresses from the forwarded message. As a result Capsule can't identify which contact to attach these messages to. For best results, use the Forward as Attachment method if your email client supports it.
- Outlook and Office 365 For best results, choose the Forward as Attachment option when forwarding emails to the Drop Box. Capsule needs the full email address for matching to contact records and Microsoft products tends to drop the email address when using the default forward method.If you are seeing extra lines between paragraphs in the messages you forward to Capsule, you can resolve this by installing the .
- Microsoft mail products such as Outlook, Office 365 and Exchange may send mail messages in a proprietary format known as TNEF that only other Microsoft products accept. Find out how to configure your Microsoft product so it doesn’t send messages in the TNEF format.
- Thunderbird: If Thunderbird offers the choice of email format choose either 'Send the message in both plain text and HTML' or 'Convert the message to plain text'. Given that most email programs handle a combination of text and HTML, you might consider setting 'Send the message in both plain text and HTML' as your preferred option. See Preferences > Composition > Send Options in Thunderbird.
- Apple Mail: To forward a message as an attachment, select the email and then select MessageForward as Attachment from the menu bar.
- Capsule Gmail add-on: Instead of forwarding messages from contacts to the Drop Box, you can use our Gmail add-on that appears in your Gmail sidebar next to each conversation to store messages on a contact in Capsule.
- Gmail.com: If you use Firefox or Chrome, you can configure Google Mail to automatically BCC your Drop Box when sending emails by installing the
Attachment file size limit
The maximum email size is 25MB. Email systems typically use a method called base64 encoding to attach files to emails. This has an overhead of about 30%, so the total size of attachments should not exceed around 17MB.
Support for international languages
The Drop Box handles most character sets used in emails and converts these to for storage. If you forward a message containing a character set that the Drop Box doesn't recognize you'll receive a notification email explaining the problem. To allow the Drop Box to recognize the message, select UTF-8 encoding when forwarding the message.
Detailed explanation of email matching rules
The Drop Box identifies contacts from their email address and looks for a match in Capsule using the following rules:
- For emails sent to a contact and BCC'd to the Drop Box, Capsule attaches the email to all recipients the email is addressed to (CC's and BCC's are ignored). Capsule will auto-create the recipients if they don't already exist.
- For emails received from a contact and forwarded to the Drop Box, the rule depends on how the email was forwarded:
- If the email was forwarded as an attachment (the preferred method), Capsule attaches the email to the sender only, auto-creating a new contact if a match is not found for the sender's email address.
- If the email was forwarded inline (the default method in Outlook and the only method in Gmail), Capsule scans the text of the email to determine the sender of the original email. Capsule attaches the email to the sender only, auto-creating a new contact if a match is not found for the sender's email address:
- For emails sent and then later forwarded to the Drop Box, the rule depends on how the email was forwarded:
- If the email was forwarded as an attachment (the preferred method), Capsule handles the email as per rule 1. above.
- If the email was forwarded inline (the default method in Outlook and the only method in Gmail), Capsule scans the text of the email to determine the recipients of the original email. In this scenario the Drop Box will only attach the email to the first recipient that the email is addressed to, auto-creating a new contact if a match is not found for the recipient's email address.
Changing the default email client
Capsule has been designed to work with the default email client on your computer. This means that when you click on an email address for a contact in Capsule a new email window will open, the contacts' email address will be populated in the TO field and your Capsule Drop Box address in the BCC field.
If you use a 3rd party email client or need to update the default email client then you can follow the instructions below:
- Click on the Start Menu button, bottom-left
- Now click on the Settings menu item
- Then click the System icon
- Now click on the Default apps menu item
- Look for the Email heading
- Click on the current default email client just below heading
- The Choose an app menu should now be in view
- Click on the email client you wish to make the default app (Outlook for example)
- Close the Settings window and you're all done.
How to store emails using the Outlook Add-in
If you're using Outlook with a Microsoft 365 subscription then you can install the Capsule Add-in for Outlook which lets you store and track email conversations without leaving the comfort of your Outlook inbox. Read more about how to install and use the Outlook Add-in in our dedicated article.
How to store emails using the Gmail Add-on
If you're a Gmail user, you can make use of the Gmail Add-on instead of the Drop Box to easily store your emails inside Capsule without ever having to leave your inbox. Install the Gmail Add-on to start storing your emails.
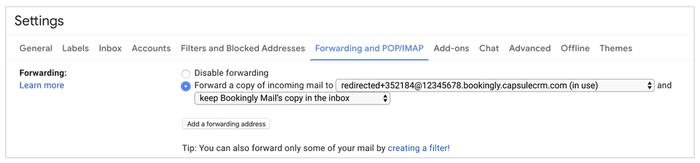
Gmail Forwarding
Gmail Forwarding allows you to auto forward emails from your Gmail contacts straight into Capsule.
To auto forward messages from your contacts straight to your Drop Box you can either create a Gmail filter to auto-forward specific messages, or configure Gmail to forward a copy of all incoming mail. To do this:
- Go to your Gmail account and click the Gear icon in the top right corner.
- Select Settings and choose ‘Forwarding and POP/IMAP’.
- Click the ‘Add a forwarding address’ button and follow the instructions on Gmail.
- Enter your unique user Drop Box address for forwarding from Gmail.
Administrators can find the unique user Drop Box addresses by visiting the following URL:
- https://[your-subdomain].capsulecrm.com/settings/dropbox/gmailforwarding
Replace [your-subdomain] with your own Capsule subdomain.
If the forwarding is set up correctly, your Gmail settings should look like the screenshot below.