La herramienta de importación se puede utilizar para agregar múltiples Oportunidades a tu cuenta de Capsule de una sola vez. Puedes encontrarla directamente yendo a la pestaña Sales Pipeline y eligiendo el botón Importar Oportunidades en la parte superior de la pantalla, lo que te llevará al centro de Importación.
Desde allí, haga clic en Desde un Archivo y elija la opción de Oportunidades para comenzar.
Cómo importar Oportunidades desde un archivo CSV o Excel
Si has utilizado un CRM en el pasado (o tienes tus datos de ventas almacenados en otros sistemas o hojas de cálculo) y tienes la opción de exportarlos a un archivo CSV o Excel, deberías poder importarlos a Capsule. La clave para importar con éxito en Capsule es realizar correctamente el paso de preparación en tu hoja de cálculo y luego asegurarte de que Capsule esté configurado para admitir cualquier campo adicional que quieras agregar.
Paso 1: Organizar tu hoja de cálculo para una importación - Campos obligatorios
Hay algunos campos obligatorios para una importación básica de Oportunidades. Hemos descrito cada uno a continuación:
| Campo | Detalles |
|---|---|
Nombre de la oportunidad | El nombre de tu Oportunidad. |
Nombre de contacto / ID | El contacto principal para su Oportunidad. Si el contacto principal es una Persona, deberá agregar su nombre y apellido en este campo, por ejemplo, Jennifer Kim (junto con su correo electrónico, consulte los detalles del campo Correo Electrónico de Contacto a continuación) o su ID de Contacto. Dado que Capsule asume una relación B2B, si la persona está vinculada a una Organización, Capsule establecerá automáticamente el contacto principal como su Organización vinculada. La Persona se agregará automáticamente como un contacto adicional. Si el contacto principal es una Organización, puedes simplemente añadir una nueva columna llamada Organización y usar el nombre de la Organización o su ID de Contacto en ese campo separado. |
Correo de contacto | El primer correo electrónico listado para su Contacto principal. |
Tubería | Un Administrador puede encontrar las Pipelines disponibles en Configuración de la cuenta > Pipelines de ventas. El nombre de la Pipeline debe coincidir exactamente con Capsule. |
Hito | Puede encontrar los Hitos disponibles existentes de un Pipeline en la pestaña de Pipeline de Ventas. Un Administrador puede editarlos siguiendo los pasos en este artículo. El nombre del Hito en su hoja de cálculo debe coincidir exactamente con Capsule. |
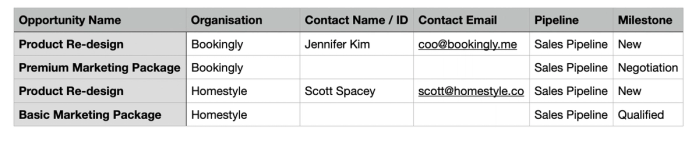
Plantilla de importación de oportunidades de ejemplo: Campos obligatorios
A continuación se muestra un ejemplo de cómo configurar su hoja de cálculo con solo los campos requeridos. Haga clic aquí para descargar la hoja de cálculo de muestra.
Paso 2: Organizar tu hoja de cálculo para una importación - Campos opcionales
Además de la información anterior, también hay muchos campos opcionales que puedes añadir a tus Oportunidades:
| Campo | Detalles |
|---|---|
Descripción | Añade cualquier detalle adicional sobre tu Oportunidad. |
Etiquetas | Puede agregar estos a sus Oportunidades de dos maneras, obtenga más información en la sección de importing Tags. |
Campos Personalizados | Dependiendo del tipo que elijas, los Campos Personalizados se formatearán de manera diferente y también podrás crear la mayoría de los tipos durante la propia importación. Lee más sobre esto en la sección de importación de Campos Personalizados. |
Fecha Estimada de Cierre | La fecha en la que se espera que se cierre la Oportunidad. Elija una de los formatos de fecha admitidos para todas las fechas en la hoja de cálculo entre dd/mm/yyyy, dd-mm-yyyy, mm/dd/yyyy, mm-dd-yyyy, yyyy/mm/dd o yyyy-mm-dd. |
Valor | El Valor Esperado de tu Oportunidad. Esto deberá ser un campo numérico único, sin comas ni símbolos. |
Moneda | La moneda del campo Valor anterior. Necesitará usar el código de moneda en este campo, por ejemplo, GBP, EUR o CAD. Si no incluye este campo, Capsule importará automáticamente la Oportunidad en su moneda predeterminada. |
Términos de pago | El campo de Términos de Pago debe ser fijo, por hora, por día, por semana, por mes o por trimestre. Si no incluyes este campo en tu hoja de cálculo, por defecto se establecerá en fijo. |
Duración del Pago | Si decides incluir el campo de Términos de Pago arriba, necesitarás especificar la Duración del Pago en números. Para una Oportunidad con 5 pagos iguales por día, el campo de Duración del Pago sería: 5 |
Pista | Puede elegir agregar una sola Pista al importar Oportunidades. Obtenga más información en la sección de importación de Pistas. |
Propietario/Equipo | Puede asignar sus Oportunidades a un Propietario y/o Equipo al importar Oportunidades. Obtenga más información en la sección de asignación de usuarios a Oportunidades. |
Probabilidad | Solo para Oportunidades abiertas. La probabilidad de ganar una Oportunidad está vinculada al Hito, puedes obtener más información sobre esto en este artículo. |
Plantilla de Importación de Oportunidades de Ejemplo: Campos Obligatorios y Opcionales
A continuación se muestra un ejemplo de cómo configurar su hoja de cálculo que incluye tanto los campos obligatorios como los opcionales. Haga clic aquí para descargar la hoja de cálculo de muestra.

Paso 3: Organizando tu hoja de cálculo para una importación - Oportunidades Ganadas vs Perdidas
Además de las oportunidades abiertas, también puedes importar oportunidades que están cerradas. Esto significa que la oportunidad está Ganada o Perdida. Obtén más información sobre oportunidades cerradas aquí.
La clave para establecer una Oportunidad como Ganada o Perdida es el campo de Hito.
- Para oportunidades ganadas: El hito necesitará ser Ganado.
- Por Oportunidades Perdidas: El Hito tendrá que ser Perdido.
Los siguientes campos opcionales solo se aplican a Oportunidades cerradas:
| Campo | Detalles |
|---|---|
Fecha de Cierre Real | La fecha en la que se ganó o perdió la Oportunidad. Elija una de los formatos de fecha admitidos para todas las fechas en la hoja de cálculo entre dd/mm/yyyy, dd-mm-yyyy, mm/dd/yyyy, mm-dd-yyyy, yyyy/mm/dd o yyyy-mm-dd. |
Razón Perdida | Por Oportunidades Perdidas. Un Administrador necesitará añadirlas primero en Configuración de la cuenta > Embudos de ventas > Pestaña de Motivos de pérdida. El Motivo de Pérdida en su hoja de cálculo deberá coincidir exactamente con Capsule. |
Plantilla de Importación de Ejemplo: Oportunidades Cerradas
Below is an example of how to set up your spreadsheet for Closed (Won and Lost) Opportunities. This includes both required and optional fields. Click here to download the sample spreadsheet.

Paso 4: Importar el archivo a Capsule
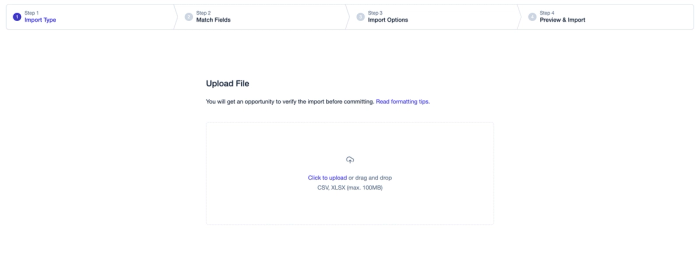
Una vez que tengas tu archivo listo, puedes seguir los pasos a continuación para importarlo a Capsule:
1. Select Import Opportunities on the Sales Pipeline tab
2. Haz clic en Desde un archivo > Oportunidades* en la pantalla. Haz clic para subir o arrastra y suelta tu archivo en el cuadro, luego selecciona Siguiente para comenzar.
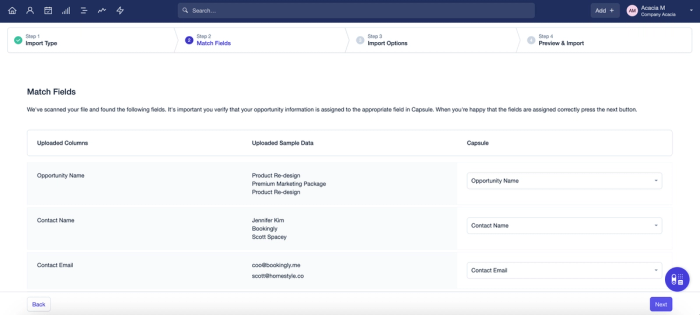
3. Ahora puede hacer coincidir las columnas de su archivo con los campos de Capsule. La herramienta de importación intentará detectar automáticamente las columnas correctas, pero por favor verifique dos veces para asegurarse de que son correctas. La sección 'Datos de Muestra Cargados' muestra qué valores de su archivo se colocarán en cada campo. En este punto, también puede crear sus Campos Personalizados.
4. Cuando hayas terminado con tu selección, haz clic en el botón de Siguiente.
5. A continuación, se te presentará una opción para elegir cómo manejar posibles duplicados que Capsule pueda encontrar en tu archivo. Puedes importarlos todos como nuevas Oportunidades de todos modos, ignorar los duplicados o elegir la opción de Importar y actualizar los duplicados utilizando los datos de tu archivo.
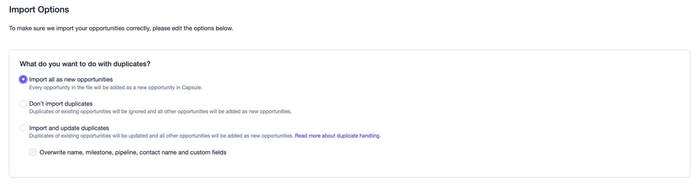
Tenemos más detalles sobre este proceso en nuestra sección dedicada a actualizar Oportunidades mediante una importación.
6. A continuación verás una vista previa de las Oportunidades que están a punto de ser importadas. Confirma que todo parece correcto y verifica que el número de Oportunidades a punto de crearse coincida con tus expectativas.
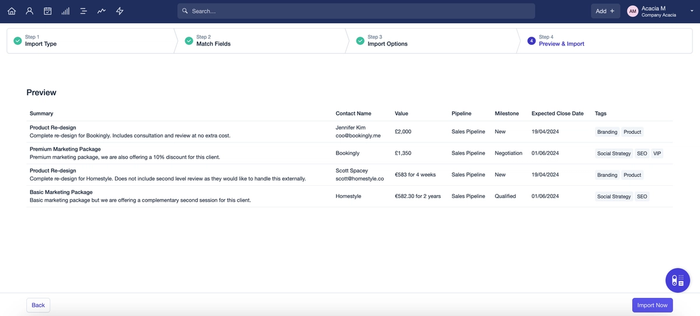
7. Finalmente, haga clic en Importar Ahora. Su importación comenzará y se le notificará por correo electrónico cuando esté completa.
Añadiendo etiquetas a oportunidades mediante importación
Agregar Etiquetas a las Oportunidades durante la importación te ayuda a organizarlas en grupos manejables desde el principio. Hay dos maneras de hacer esto:
- El primero es agregar una sola columna llamada ‘Etiquetas’ y luego añadir tus Etiquetas a cada contacto relevante en una lista separada por comas:
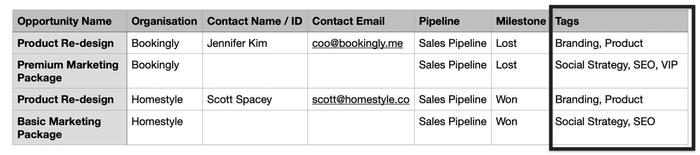
- La segunda opción es añadir una columna separada para cada Etiqueta e incluir la Etiqueta en cada fila donde desee que se aplique:

Cuando llegues a la etapa de mapeo en Capsule, selecciona la opción de Aplicar como etiqueta.
Añadiendo campos personalizados a oportunidades mediante importación
Añadir Campos Personalizados a tus Oportunidades es una manera rápida y sencilla de almacenar información única desde el principio. Dependiendo del tipo de dato que quieras añadir, hay algunos detalles importantes a tener en cuenta:
- Texto: Los campos de texto tienen un límite de 250 caracteres.
- Fecha: Elija una de los formatos de fecha admitidos para todas las fechas en la hoja de cálculo entre dd/mm/yyyy, dd-mm-yyyy, mm/dd/yyyy, mm-dd-yyyy, yyyy/mm/dd o yyyy-mm-dd.
- Casilla de verificación: Para marcado, use Y o VERDADERO. Para no marcado, use N o FALSO.
- Número: Los campos numéricos tienen un límite de 12 caracteres con hasta 3 decimales opcionales.
- Lista: Los campos de la lista deben configurarse primero en la Configuración de la cuenta. Es un campo de selección única, por lo que necesitarás agregar un único valor para esa oportunidad en su fila.
Los Campos Personalizados para Oportunidades se añaden en Account SettingsCustom FieldsOpportunities tab. Si eres un Usuario Administrador, para agilizar el proceso, puedes configurar la mayoría de los Campos Personalizados durante la importación:
- At the matching fields Stage, click on the No Match Field
- Elegir Agregar Nuevo Campo Personalizado
- Rellene todos los detalles, incluyendo el Tipo y la Descripción
- Haz clic en Guardar
El campo será creado y una vez que la importación haya terminado, la información en la columna de ese campo se almacenará en tus Oportunidades.
Gif showing the user creating a Custom Text Field while importing
Añadiendo una pista a las oportunidades mediante importación
Adding a Track to your Opportunity means that you will have the first bulk of tasks applied and ready to be worked on as soon as the import is done. An Administrator will need to make sure the Track is set up in Account SettingsTracksOpportunities tab first.
In your spreadsheet, you need to include the Track Name or ID in a column called ‘Apply as Track’. Then when importing, you can map to the right fields. For example, to apply a Track called ‘VIP Track’ to the Opportunities, you would map it like this:
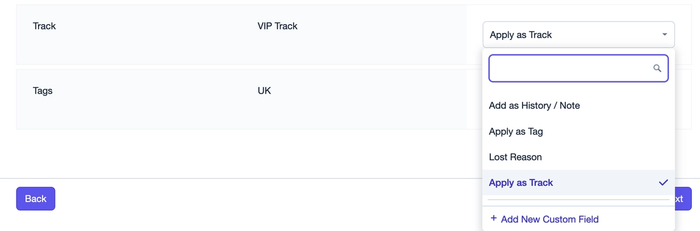
That will apply the Track to any Opportunities with that column populated.
How to assign users to Opportunities via import
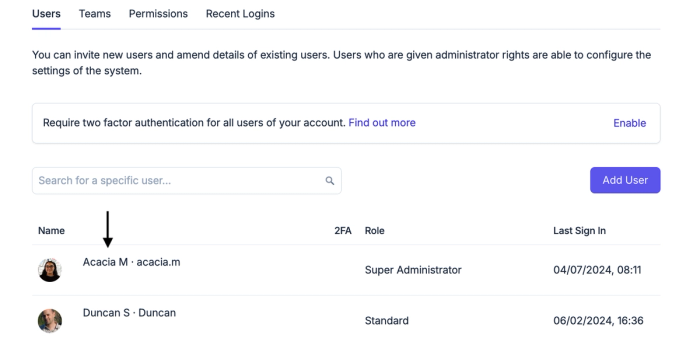
To assign Opportunities to a specific User when importing, you will need to first know the display name or username of the Capsule user. Any Administrator on your account can find the Display name of each user by going to Account Settings > Users and Teams.
In your spreadsheet, you will need to add a column in your file with the header ‘Owner’. You can then add the Display name or Username for the Capsule User you would like to assign each Opportunity to in each respective row.

If you are on the Growth, Advanced or Ultimate Plans, you can also assign an Opportunity to a Team. To do this, add a seperate column called 'Team', then add the Team name to the right Opportunity rows. Teams can also be found in Account Settings.
How to import Opportunity history
When importing your Opportunities using the CSV or Excel import process you can also import notes & emails. To import multiple notes for the same Opportunity and to set a date for your history entry you will need to use this format:
*** NOTE ***
2024-01-01
First interesting note
*** NOTE ***
2024-03-20
Second interesting note
Emails can be imported with similar formatting - you just replace NOTE with EMAIL like this:
*** EMAIL ***
2024-02-28
First interesting email
- The note separator field must be formatted exactly as in the example without any extra or removed spaces.
- The date element is optional.
- Excel truncates fields to a relatively short limit of 32,000 characters. As a result, Excel is unsuitable if you're generating CSV or Excel files with long note histories.
Then during the import, you map the history column in your file to 'Add as History/Note' in Capsule.

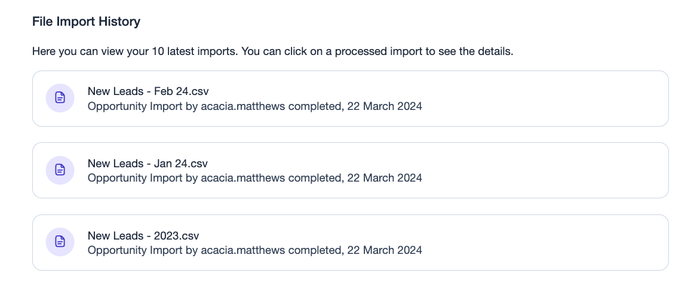
How to view the last imports
After every import, you will get a confirmation email with a summary of the import and the link to view the imported Opportunities in Capsule. If you want to see a recent list of Opportunities that you've previously imported, this can also be done from within Capsule:
- Go to the Sales Pipeline tab
- Choose the Import Opportunities button
- Scroll down to the File Import History section and click on your chosen import for more details
How to delete a list of Opportunities added by Import
Capsule has the option for Administrators to delete Opportunities in bulk. They will then go to the Trash area, where they will be held for 30 days and can be restored by your Super Administrator if needed. We cover both ways of deleting Opportunities in the sections below.
How to undo the last Opportunity Import
If you want to undo your last import for any reason, you have the option to view any new opportunities added in your last import which an Administrator can then delete in bulk. To do that, you should follow these steps:
1. Go to the Sales Pipeline tab
2. Select Last Import from the Saved Lists at the top of the page

3. To delete some Opportunities in your results, select them by clicking the checkbox next to their names before clicking the Trash icon in the top right of the page. Or click the Trash button straight away to select all of the Opportunities to delete.
How to undo previous Opportunity Imports
If you want to undo any previous imports, you have the option to view any new opportunities added in from them, which an Administrator can then delete in bulk. To do that, you should follow these steps:
- Go to the Sales Pipeline tab
- Choose the Import Opportunities button
- Scroll down to the File Import History section and click on your chosen import
- In the window, click to View the Opportunities added in that import
- To delete some Opportunities in your results, select them by clicking the checkbox next to their names before clicking the Trash icon in the top right of the page. Or click the Trash button straight away to select all of the Opportunities to delete.
Opportunity Import CSV or Excel Troubleshooting
Whether it’s your full import or a specific row, there are a few reasons that can cause them to have trouble importing into Capsule. After every Import, Capsule will generate a file of any Opportunities that have failed or been ignored. This called the Unhandled file.
To view the Unhandled file for an Opportunity Import:
- Go to the Sales Pipeline tab
- Choose the Import Opportunities button in the top right
- Scroll down to the File Import History section and click on your chosen Opportunity import
- In the yellow box, choose the button to download the file
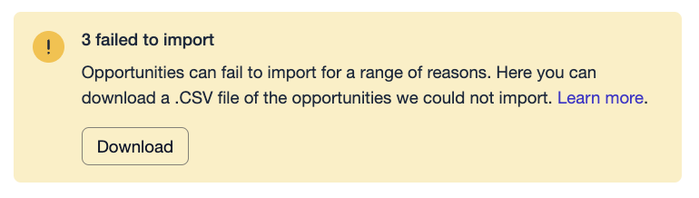
In that Unhandled file, you will find a Reason column that gives more detail on why specific Opportunities did not import. We have explained all reasons in the section below.
What does each reason mean?
Once you have downloaded the Unhandled file for your Opportunity Import - you will find a reason column, explaining why each row failed, or was ignored.
| Reason | Relates To (Capsule Field) | Details |
|---|---|---|
Opportunity missing name | Opportunity Name | The Opportunity Name is a required field and must be mapped for the import to work. Read more about this in the Required Fields section. |
Contact not found with provided id | Contact Name / ID and Contact Email | The ID in the spreadsheet does not match a contact in Capsule. Check the ID is an exact match. |
Multiple contacts found with name & email address | Contact Name / ID and Contact Email | Capsule cannot add the Opportunity as more than one contact has been found in Capsule with the same name and email address. |
No id or name & email provided for primary contact | Contact Name / ID and Contact Email | The Contact Name / ID and Contact Email are both required fields and must be mapped for the import to work. Read more about this in the Required Fields section. |
Pipeline required | Pipeline | The Pipeline is a required field and must be mapped for the import to work. Read more about this in the Required Fields section. |
Pipeline not found | Pipeline | The Pipeline found in the spreadsheet cannot be found in Capsule. Check the Pipeline name is an exact match to Capsule. |
Pipeline archived | Pipeline | The Pipeline used in the spreadsheet has already been archived. You cannot import Opportunities to Archived Pipelines. |
Opportunity milestone required | Milestone | The Milestone is a required field and must be mapped for the import to work. Read more about this in the Required Fields section. |
Opportunity milestone not found | Milestone | The Milestone in the spreadsheet cannot be found in Capsule. Check the Milestone name is an exact match to Capsule. |
Opportunity milestone not on Pipeline | Milestone | The Milestone found is not on the Pipeline used in the spreadsheet. Check the Milestones available in the Pipeline. |
Opportunity milestone archived | Milestone | The Milestone used in the spreadsheet has already been removed. You cannot import Opportunities to Archives Milestones. |
Expected close on date invalid | Expected Close Date | The Date field is not in a valid format. Make sure that you have chosen one of the supported date formats for all dates in the spreadsheet out of: dd/mm/yyyy, dd-mm-yyyy, mm/dd/yyyy, mm-dd-yyyy, yyyy/mm/dd or yyyy-mm-dd |
Actual close on date invalid | Actual Close Date | The Date field is not in a valid format. Make sure that you have chosen one of the supported date formats for all dates in the spreadsheet out of: dd/mm/yyyy, dd-mm-yyyy, mm/dd/yyyy, mm-dd-yyyy, yyyy/mm/dd or yyyy-mm-dd |
Attempting to set actual date on open opportunity | Actual Close Date | Attempting to set actual date on open opportunity - Where an actual close date is found for an open opportunity. Read more about this in the Importing Won and Lost Opportunities section. |
Opportunity Value invalid | Value | The Value field will need to be a single number field, without any commas or symbols. |
Currency invalid | Currency | The currency field needs to be just the code, without any symbols e.g.GBP or EUR. |
Invalid value for payment terms | Payment Terms | The Payment Terms field must be either fixed, hour, day, week ,month or quarter. |
Invalid number/value for payment duration | Payment Duration | The Payment Duration field is a single number value e.g 5 |
Payment duration set with fixed payment terms | Payment Terms & Payment Duration | Where the Payment Terms field has been set to fixed, but there is a Payment duration field in that same row e.g. Payment Terms = Fixed and Payment Duration = 5 |
Payment duration not set with non-fixed payment terms | Payment Terms & Payment Duration | Where the Payment Terms field has been set to a time period but there is no Payment Duration field in that same row, so Capsule does not have the full information e.g Payment Terms = Day and there is nothing in the Payment Duration field. |
Owner specified but not found | Owner | Where an owner has been included in the spreadsheet but has not been found in Capsule. Read more on assigning Opportunities via import here. |
Multiple users found with display name | Team | Where an Owner has been included in the spreadsheet but Capsule has found more than one user with the same display name. Read more on assigning Opportunities via import here. |
Team specified but not found | Team | Where a Team has been included in the spreadsheet but this has not been found in Capsule. Read more on assigning Opportunities via import here. |
Track not found | Track | The Track in the spreadsheet cannot be found. Check the Track name (or ID if used instead) is an exact match to Capsule. |
Multiple tracks found with same name | Track | There are multiple Tracks with the same name in Capsule, so Capsule cannot tell which one to add. In this case, you can use the Track ID as a match instead. Find out more in the importing Tracks section. |
Track wrong type (not Opportunity) | Track | The Track in the spreadsheet is not set up for Opportunities. Check Account Settings > Tracks > Opportunities tab. |
Probability invalid | Probability | The probability field will need to be a single value between 1 - 100. |
Probability invalid (unparsable) | Probability | A probability has been found but Capsule cannot get a number from the given value. |
Unsupported currency | Currency | The Currency in the spreadsheet is not supported in Capsule.You will need to use the currency code in this field e.g. GBP, EUR or CAD. |
Lost reason not found | Lost Reason | The Lost Reason in the spreadsheet has not been found. Check that the Lost Reason is an exact match in Capsule. |
Lost reason set on non-lost milestone | Lost Reason and Milestone | There is a Lost Reason set for an open Opportunity. Read more about this in the Importing Won and Lost Opportunities section. |
Opportunity with id not found | Opportunity ID | Where the Opportunity ID for the Opportunity cannot be found. Read more about this in Updating Opportunities through an import. |
Can't specify opportunity id and import all as new | Opportunity ID | A field has been mapped to the Opportunity ID but the import as new option has been selected in Step 3 of the import tool. If you want to import the opportunity as new, remove the Opportunity ID field or map it to ignore when importing. |
There are also situations where a Custom Field does not match your settings in Capsule, you can read more about the different types in the importing Custom Fields section. The following reasons apply:
| Reason | Details |
|---|---|
Invalid value for list | The entry in your spreadsheet is not part of the List Custom Field or does not exactly match Capsule. For example, importing a value of C or D when the List Custom Field only includes A, B or C+. |
Invalid number for custom field | Custom Number fields have a 12-character limit with optional 3 decimal places. |
Invalid date field/format | You must choose one of the supported date formats for all dates in the spreadsheet out of dd/mm/yyyy, dd-mm-yyyy, mm/dd/yyyy, mm-dd-yyyy, yyyy/mm/dd or yyyy-mm-dd. |
Deleted after import | The Custom Field was deleted after the import was completed. |
If you need some extra support, you can email support@capsulecrm.com with a copy of the file for more information.