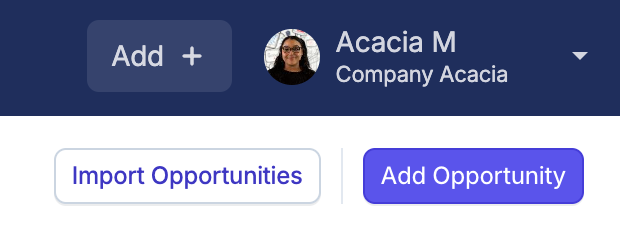
L'outil d'importation peut être utilisé pour ajouter plusieurs Opportunités à votre compte Capsule en une seule fois. Vous pouvez le trouver directement en allant à l'onglet Sales Pipeline et en choisissant le bouton Importer des opportunités situé en haut de l'écran, ce qui vous amènera au centre d'importation.
De là, cliquez sur À partir d'un fichier et choisissez l'option Opportunités pour commencer.
Comment importer des opportunités à partir d'un fichier CSV ou Excel
Si vous avez déjà utilisé un CRM par le passé (ou que vous avez vos données de vente stockées dans d'autres systèmes ou tableurs) et que vous avez la possibilité de les exporter vers un fichier CSV ou Excel, vous devriez pouvoir les importer dans Capsule. La clé pour réussir l'importation dans Capsule est de bien préparer votre tableur et ensuite de s'assurer que Capsule est configuré pour prendre en charge les champs supplémentaires que vous souhaitez ajouter.
Étape 1 : Organisation de votre feuille de calcul pour une importation - Champs requis
Il y a quelques champs obligatoires pour une importation basique d'Opportunité. Nous avons décrit chacun ci-dessous :
| Champ | Détails |
|---|---|
Nom de l'opportunité | Le nom de votre opportunité. |
Nom / ID du contact | Le contact principal pour votre opportunité. Si le contact principal est une Personne, vous devrez ajouter son prénom et son nom dans ce champ, par exemple Jennifer Kim (ainsi que son courriel, voir les détails du champ Courriel du contact ci-dessous) ou son Identifiant de Contact. Comme Capsule suppose une relation B2B - si la personne est liée à une Organisation, Capsule définira automatiquement le contact principal comme leur Organisation liée. La Personne sera automatiquement ajoutée en tant que contact supplémentaire. Si le contact principal est une Organisation, vous pouvez simplement ajouter une nouvelle colonne appelée Organisation et utiliser le nom de l'Organisation ou son ID de contact dans ce champ séparé. |
Courriel de contact | Le premier e-mail répertorié pour votre Contact principal. |
Pipeline | Un administrateur peut trouver les pipelines disponibles dans Paramètres du compte > Pipelines de vente. Le nom du pipeline doit correspondre exactement à Capsule. |
Jalon | Vous pouvez trouver les Jalons existants disponibles d’un Pipeline dans l’onglet Pipeline de Ventes. Un Administrateur peut les modifier en suivant les étapes dans cet article. Le nom du Jalon dans votre feuille de calcul doit correspondre exactement à Capsule. |
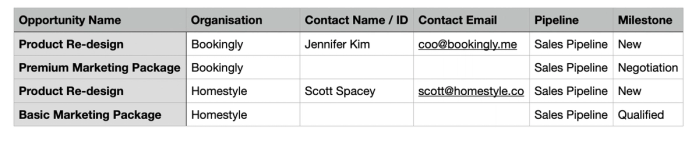
Modèle d'importation d'opportunités exemple : Champs obligatoires
Voici un exemple de la manière de configurer votre feuille de calcul avec uniquement les champs requis. Cliquez ici pour télécharger le tableau d'exemple.
Étape 2 : Organisation de votre feuille de calcul pour une importation - Champs optionnels
En plus des informations ci-dessus, il existe également de nombreux champs facultatifs que vous pouvez ajouter à vos Opportunités :
| Champ | Détails |
|---|---|
Description | Ajoutez tous les détails supplémentaires concernant votre opportunité. |
Étiquettes | Vous pouvez ajouter ceux-ci à vos Opportunités de deux manières, découvrez-en plus dans la section importation de Tags. |
Champs personnalisés | Selon le type que vous choisissez, les champs personnalisés seront formatés différemment et vous pouvez également créer la plupart des types lors de l'importation elle-même. Pour en savoir plus, consultez la section importation des champs personnalisés. |
Date de clôture prévue | La date à laquelle l'opportunité est prévue pour se conclure. Choisissez une des formats de date pris en charge pour toutes les dates dans le tableur parmi dd/mm/yyyy, dd-mm-yyyy, mm/dd/yyyy, mm-dd-yyyy, yyyy/mm/dd ou yyyy-mm-dd. |
Valeur | La Valeur Attendue de votre Opportunité. Cela devra être un champ numérique unique, sans aucune virgule ni symbole. |
Devise | La devise du champ Valeur ci-dessus. Vous devrez utiliser le code de la devise dans ce champ, par exemple GBP, EUR ou CAD. Si vous n'incluez pas ce champ, Capsule importera automatiquement l'Opportunité dans votre devise par défaut. |
Conditions de paiement | Le champ Conditions de paiement doit être soit fixe, soit heure, soit jour, soit semaine, soit mois soit trimestre. Si vous n'incluez pas ce champ dans votre feuille de calcul, la valeur par défaut sera fixe. |
Durée de paiement | Si vous choisissez d'inclure le champ Conditions de paiement ci-dessus, vous devrez spécifier la Durée de paiement en chiffres. Pour une Opportunité avec 5 paiements égaux par jour, le champ Durée de paiement serait : 5 |
Piste | Vous pouvez choisir d'ajouter un seul parcours lors de l'importation d'opportunités. Pour en savoir plus, consultez la section sur l'importation des parcours. |
Propriétaire/Équipe | Vous pouvez attribuer vos Opportunités à un Propriétaire et/ou à une Équipe lors de l'importation des Opportunités. Pour en savoir plus, consultez la section affectation des utilisateurs aux Opportunités. |
Probabilité | Uniquement pour les opportunités ouvertes. La probabilité de gagner une opportunité est liée à l'étape Jalon, vous pouvez en savoir plus à ce sujet dans cet article. |
Modèle d'importation d'opportunités exemple : Champs obligatoires et optionnels
Below is an example of how to set up your spreadsheet that includes both required and optional fields. Click here to download the sample spreadsheet.

Étape 3 : Organisation de votre feuille de calcul pour une importation - Opportunités gagnées contre perdues
En plus des opportunités ouvertes, vous pouvez également importer des opportunités qui sont fermées. Cela signifie que l'opportunité est soit Gagnée soit Perdue. Découvrez-en plus sur les opportunités fermées ici.
La clé pour définir une Opportunité comme Gagnée ou Perdue est le champ Milestone.
- Pour les opportunités remportées : L'étape devra être Gagnée.
- Pour les opportunités perdues : Il faudra que l'étape soit Perdue.
Les champs optionnels suivants s'appliquent uniquement aux opportunités clôturées :
| Champ | Détails |
|---|---|
Date de clôture réelle | La date à laquelle l'Opportunité a été Gagnée ou Perdue. Choisissez une des formats de date pris en charge pour toutes les dates dans le tableur parmi dd/mm/yyyy, dd-mm-yyyy, mm/dd/yyyy, mm-dd-yyyy, yyyy/mm/dd ou yyyy-mm-dd. |
Raison Perdue | For Lost Opportunities. An Administrator will need to add these to the Account Settings > Sales Pipelines > Lost Reasons tab first. The Lost Reason in your spreadsheet will need to match Capsule exactly. |
Modèle d'importation d'exemple : Opportunités clôturées
Below is an example of how to set up your spreadsheet for Closed (Won and Lost) Opportunities. This includes both required and optional fields. Click here to download the sample spreadsheet.

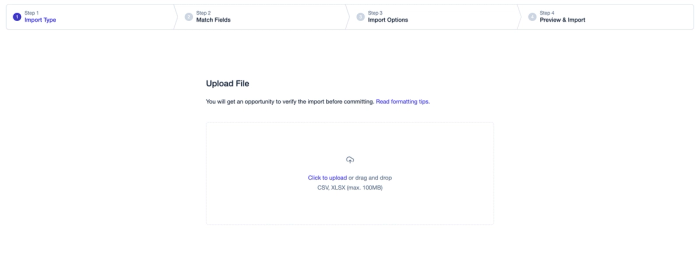
Étape 4 : Importation du fichier dans Capsule
Once you have your file ready to go, you can follow the steps below to import it into Capsule:
1. Select Import Opportunities on the Sales Pipeline tab
2. Click From a File > Opportunities* from the screen. Click to upload or drag and drop your file into the box, then select Next to get started.
3. Now you can match up the columns in your file to the Capsule fields. The Import tool will try to automatically detect the right columns but please double-check to make sure they are correct. The 'Uploaded Sample Data' section shows what values from your file will be put into each field. At this point, you can also create your Custom Fields.
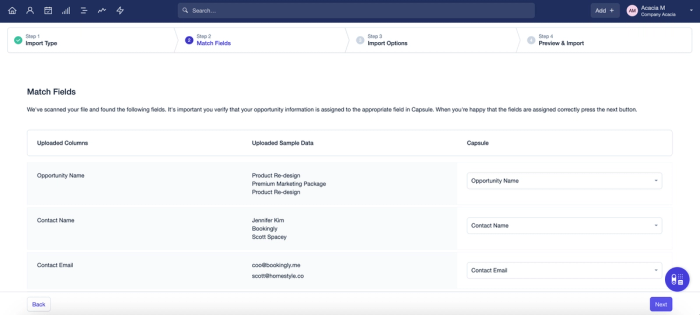
4. When you're done with your selection, click the Next button.
5. You'll then be presented with an option to choose how to handle any possible duplicates that Capsule may find in your file. You can either import them all as new Opportunities anyway, ignore the duplicates or choose the option to Import and update duplicates using the data from your file.
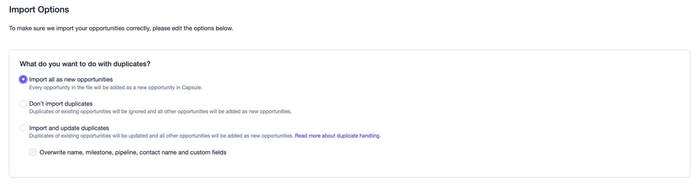
We have more details on this process in our dedicated section on updating Opportunities with an import.
6. Next you'll see a preview of the Opportunities that are about to be imported. Confirm that it all looks right and check to make sure that the number of Opportunities about to be created matches up with your expectations.
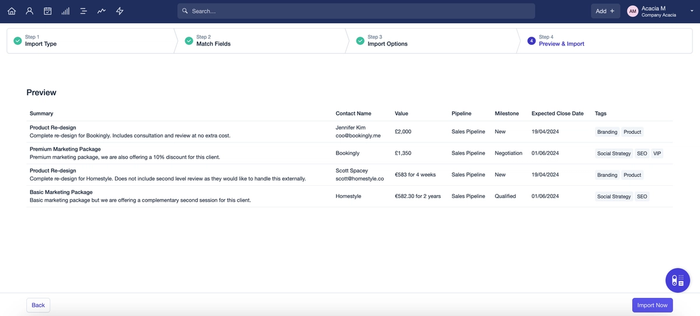
7. Finally, click Import Now. Your import will start and you will be notified via email when it's complete.
Adding Tags to Opportunities via import
Adding Tags to Opportunities during import helps you to organise them into manageable groups from the outset. There are two ways to do this:
- The first is to add a single column called ‘Tags’ and then add your Tags to each relevant contact as a comma-separated list:
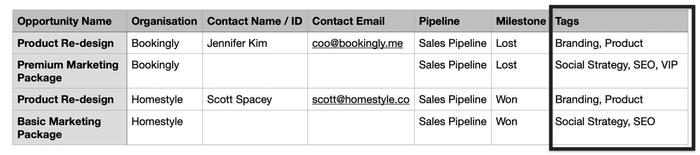
- The second option is to add a separate column for each Tag and just add the Tag in each row where you would like it to be applied:

When you come to the mapping stage in Capsule, select the option to Apply as tag.
Adding Custom Fields to Opportunities via import
Adding Custom Fields to your Opportunities is a quick and easy way to store unique information right from the start. Depending on the data type you want to add, there are some important details to note:
- Text: Text fields have a 250-character limit.
- Date: Choose one of the supported date formats for all dates in the spreadsheet out of dd/mm/yyyy, dd-mm-yyyy, mm/dd/yyyy, mm-dd-yyyy, yyyy/mm/dd or yyyy-mm-dd.
- Check Box: For checked, use Y or TRUE. For not checked, use N or FALSE.
- Number: Number fields have a 12-character limit with optional 3 decimal places.
- List: List fields will need to be set up in Account Settings first. It is a single select field, so you will need to add a single value for that opportunity in their row.
Custom Fields for Opportunities are added in Account SettingsCustom FieldsOpportunities tab. If you are an Administrator User, to make the process quicker, you can set up most Custom Fields when importing instead:
- At the matching fields Stage, click on the No Match Field
- Choose Add New Custom Field
- Fill in all of the details for it including the Type and Description
- Click Save
The field will then be created and once the import has finished, the information in the column for that field will be stored against your Opportunities.
Gif showing the user creating a Custom Text Field while importing
Adding a Track to Opportunities via import
Adding a Track to your Opportunity means that you will have the first bulk of tasks applied and ready to be worked on as soon as the import is done. An Administrator will need to make sure the Track is set up in Account SettingsTracksOpportunities tab first.
In your spreadsheet, you need to include the Track Name or ID in a column called ‘Apply as Track’. Then when importing, you can map to the right fields. For example, to apply a Track called ‘VIP Track’ to the Opportunities, you would map it like this:
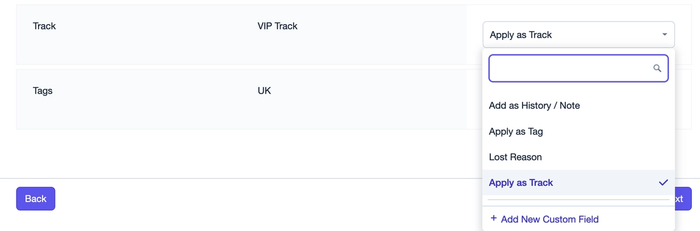
That will apply the Track to any Opportunities with that column populated.
How to assign users to Opportunities via import
To assign Opportunities to a specific User when importing, you will need to first know the display name or username of the Capsule user. Any Administrator on your account can find the Display name of each user by going to Account Settings > Users and Teams.
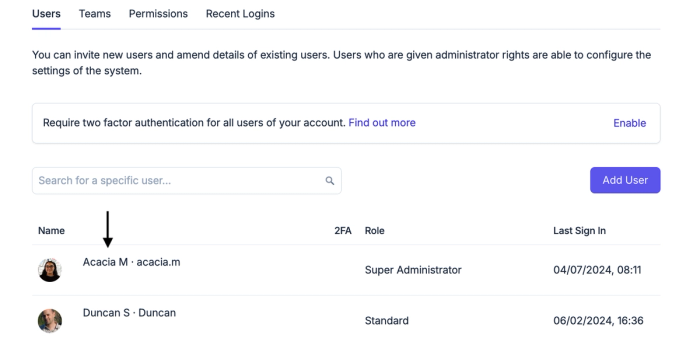
In your spreadsheet, you will need to add a column in your file with the header ‘Owner’. You can then add the Display name or Username for the Capsule User you would like to assign each Opportunity to in each respective row.

If you are on the Growth, Advanced or Ultimate Plans, you can also assign an Opportunity to a Team. To do this, add a seperate column called 'Team', then add the Team name to the right Opportunity rows. Teams can also be found in Account Settings.
How to import Opportunity history
When importing your Opportunities using the CSV or Excel import process you can also import notes & emails. To import multiple notes for the same Opportunity and to set a date for your history entry you will need to use this format:
*** NOTE ***
2024-01-01
First interesting note
*** NOTE ***
2024-03-20
Second interesting note
Emails can be imported with similar formatting - you just replace NOTE with EMAIL like this:
*** EMAIL ***
2024-02-28
First interesting email
- The note separator field must be formatted exactly as in the example without any extra or removed spaces.
- The date element is optional.
- Excel truncates fields to a relatively short limit of 32,000 characters. As a result, Excel is unsuitable if you're generating CSV or Excel files with long note histories.
Then during the import, you map the history column in your file to 'Add as History/Note' in Capsule.

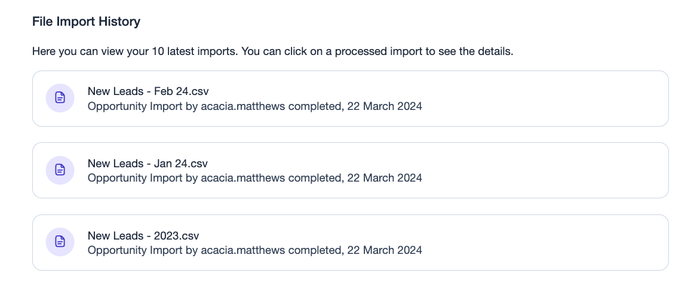
How to view the last imports
After every import, you will get a confirmation email with a summary of the import and the link to view the imported Opportunities in Capsule. If you want to see a recent list of Opportunities that you've previously imported, this can also be done from within Capsule:
- Go to the Sales Pipeline tab
- Choose the Import Opportunities button
- Scroll down to the File Import History section and click on your chosen import for more details
How to delete a list of Opportunities added by Import
Capsule has the option for Administrators to delete Opportunities in bulk. They will then go to the Trash area, where they will be held for 30 days and can be restored by your Super Administrator if needed. We cover both ways of deleting Opportunities in the sections below.
How to undo the last Opportunity Import
If you want to undo your last import for any reason, you have the option to view any new opportunities added in your last import which an Administrator can then delete in bulk. To do that, you should follow these steps:
1. Go to the Sales Pipeline tab
2. Select Last Import from the Saved Lists at the top of the page

3. To delete some Opportunities in your results, select them by clicking the checkbox next to their names before clicking the Trash icon in the top right of the page. Or click the Trash button straight away to select all of the Opportunities to delete.
How to undo previous Opportunity Imports
If you want to undo any previous imports, you have the option to view any new opportunities added in from them, which an Administrator can then delete in bulk. To do that, you should follow these steps:
- Go to the Sales Pipeline tab
- Choose the Import Opportunities button
- Scroll down to the File Import History section and click on your chosen import
- In the window, click to View the Opportunities added in that import
- To delete some Opportunities in your results, select them by clicking the checkbox next to their names before clicking the Trash icon in the top right of the page. Or click the Trash button straight away to select all of the Opportunities to delete.
Opportunity Import CSV or Excel Troubleshooting
Whether it’s your full import or a specific row, there are a few reasons that can cause them to have trouble importing into Capsule. After every Import, Capsule will generate a file of any Opportunities that have failed or been ignored. This called the Unhandled file.
To view the Unhandled file for an Opportunity Import:
- Go to the Sales Pipeline tab
- Choose the Import Opportunities button in the top right
- Scroll down to the File Import History section and click on your chosen Opportunity import
- In the yellow box, choose the button to download the file
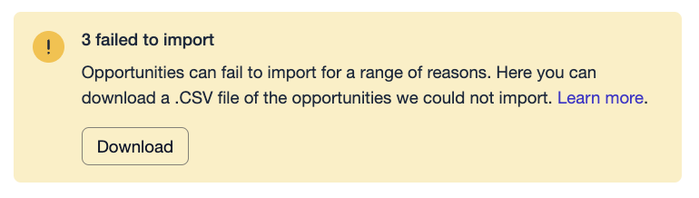
In that Unhandled file, you will find a Reason column that gives more detail on why specific Opportunities did not import. We have explained all reasons in the section below.
What does each reason mean?
Once you have downloaded the Unhandled file for your Opportunity Import - you will find a reason column, explaining why each row failed, or was ignored.
| Reason | Relates To (Capsule Field) | Details |
|---|---|---|
Opportunity missing name | Opportunity Name | The Opportunity Name is a required field and must be mapped for the import to work. Read more about this in the Required Fields section. |
Contact not found with provided id | Contact Name / ID and Contact Email | The ID in the spreadsheet does not match a contact in Capsule. Check the ID is an exact match. |
Multiple contacts found with name & email address | Contact Name / ID and Contact Email | Capsule cannot add the Opportunity as more than one contact has been found in Capsule with the same name and email address. |
No id or name & email provided for primary contact | Contact Name / ID and Contact Email | The Contact Name / ID and Contact Email are both required fields and must be mapped for the import to work. Read more about this in the Required Fields section. |
Pipeline required | Pipeline | The Pipeline is a required field and must be mapped for the import to work. Read more about this in the Required Fields section. |
Pipeline not found | Pipeline | The Pipeline found in the spreadsheet cannot be found in Capsule. Check the Pipeline name is an exact match to Capsule. |
Pipeline archived | Pipeline | The Pipeline used in the spreadsheet has already been archived. You cannot import Opportunities to Archived Pipelines. |
Opportunity milestone required | Milestone | The Milestone is a required field and must be mapped for the import to work. Read more about this in the Required Fields section. |
Opportunity milestone not found | Milestone | The Milestone in the spreadsheet cannot be found in Capsule. Check the Milestone name is an exact match to Capsule. |
Opportunity milestone not on Pipeline | Milestone | The Milestone found is not on the Pipeline used in the spreadsheet. Check the Milestones available in the Pipeline. |
Opportunity milestone archived | Milestone | The Milestone used in the spreadsheet has already been removed. You cannot import Opportunities to Archives Milestones. |
Expected close on date invalid | Expected Close Date | The Date field is not in a valid format. Make sure that you have chosen one of the supported date formats for all dates in the spreadsheet out of: dd/mm/yyyy, dd-mm-yyyy, mm/dd/yyyy, mm-dd-yyyy, yyyy/mm/dd or yyyy-mm-dd |
Actual close on date invalid | Actual Close Date | The Date field is not in a valid format. Make sure that you have chosen one of the supported date formats for all dates in the spreadsheet out of: dd/mm/yyyy, dd-mm-yyyy, mm/dd/yyyy, mm-dd-yyyy, yyyy/mm/dd or yyyy-mm-dd |
Attempting to set actual date on open opportunity | Actual Close Date | Attempting to set actual date on open opportunity - Where an actual close date is found for an open opportunity. Read more about this in the Importing Won and Lost Opportunities section. |
Opportunity Value invalid | Value | The Value field will need to be a single number field, without any commas or symbols. |
Currency invalid | Currency | The currency field needs to be just the code, without any symbols e.g.GBP or EUR. |
Invalid value for payment terms | Payment Terms | The Payment Terms field must be either fixed, hour, day, week ,month or quarter. |
Invalid number/value for payment duration | Payment Duration | The Payment Duration field is a single number value e.g 5 |
Payment duration set with fixed payment terms | Payment Terms & Payment Duration | Where the Payment Terms field has been set to fixed, but there is a Payment duration field in that same row e.g. Payment Terms = Fixed and Payment Duration = 5 |
Payment duration not set with non-fixed payment terms | Payment Terms & Payment Duration | Where the Payment Terms field has been set to a time period but there is no Payment Duration field in that same row, so Capsule does not have the full information e.g Payment Terms = Day and there is nothing in the Payment Duration field. |
Owner specified but not found | Owner | Where an owner has been included in the spreadsheet but has not been found in Capsule. Read more on assigning Opportunities via import here. |
Multiple users found with display name | Team | Where an Owner has been included in the spreadsheet but Capsule has found more than one user with the same display name. Read more on assigning Opportunities via import here. |
Team specified but not found | Team | Where a Team has been included in the spreadsheet but this has not been found in Capsule. Read more on assigning Opportunities via import here. |
Track not found | Track | The Track in the spreadsheet cannot be found. Check the Track name (or ID if used instead) is an exact match to Capsule. |
Multiple tracks found with same name | Track | There are multiple Tracks with the same name in Capsule, so Capsule cannot tell which one to add. In this case, you can use the Track ID as a match instead. Find out more in the importing Tracks section. |
Track wrong type (not Opportunity) | Track | The Track in the spreadsheet is not set up for Opportunities. Check Account Settings > Tracks > Opportunities tab. |
Probability invalid | Probability | The probability field will need to be a single value between 1 - 100. |
Probability invalid (unparsable) | Probability | A probability has been found but Capsule cannot get a number from the given value. |
Unsupported currency | Currency | The Currency in the spreadsheet is not supported in Capsule.You will need to use the currency code in this field e.g. GBP, EUR or CAD. |
Lost reason not found | Lost Reason | The Lost Reason in the spreadsheet has not been found. Check that the Lost Reason is an exact match in Capsule. |
Lost reason set on non-lost milestone | Lost Reason and Milestone | There is a Lost Reason set for an open Opportunity. Read more about this in the Importing Won and Lost Opportunities section. |
Opportunity with id not found | Opportunity ID | Where the Opportunity ID for the Opportunity cannot be found. Read more about this in Updating Opportunities through an import. |
Can't specify opportunity id and import all as new | Opportunity ID | A field has been mapped to the Opportunity ID but the import as new option has been selected in Step 3 of the import tool. If you want to import the opportunity as new, remove the Opportunity ID field or map it to ignore when importing. |
There are also situations where a Custom Field does not match your settings in Capsule, you can read more about the different types in the importing Custom Fields section. The following reasons apply:
| Reason | Details |
|---|---|
Invalid value for list | The entry in your spreadsheet is not part of the List Custom Field or does not exactly match Capsule. For example, importing a value of C or D when the List Custom Field only includes A, B or C+. |
Invalid number for custom field | Custom Number fields have a 12-character limit with optional 3 decimal places. |
Invalid date field/format | You must choose one of the supported date formats for all dates in the spreadsheet out of dd/mm/yyyy, dd-mm-yyyy, mm/dd/yyyy, mm-dd-yyyy, yyyy/mm/dd or yyyy-mm-dd. |
Deleted after import | The Custom Field was deleted after the import was completed. |
If you need some extra support, you can email support@capsulecrm.com with a copy of the file for more information.